Sunday, May 15, 2016

Volumetric Smoke and Fog

I haven't done too much new in 3DWorld over the past month. I've mostly been working on performance optimizations for tree rendering and bug fixes for ship combat in universe mode. Maybe at some point I'll make a post on one of those topics, but I don't have enough interesting content for either of them yet.

Last week, I read Alexandre Pestana's post on Volumetric Lights. This got me thinking about adding this effect to 3DWorld. In fact, I had already added this a while back, but I never posted any of the screenshots. It took a bit of effort to get it working again, and now I can write a blog post about it.

I've already talked about rendering "God rays", a type of volumetric lighting, in a previous blog post. Here is a screenshot from a few months ago, where the sun rays are visible through the leaves of a palm tree.

"God Rays" showing through palm trees using a screen space postprocessing pass.

This is a nice, fast screen-space technique, but it only works when the light (sun in this case) is visible. And it only works for uniform fog density. I needed a better system without these limitations, even if it meant spending more frame time drawing the fog. I decided to add this feature to my smoke effects shader code path, but have the fog density come from a procedural function rather than a 3D smoke texture constructed from smoke diffusion on the CPU.

I used a standard volumetric ray marching technique to step from the scene hit point to the viewer in eye space using uniform steps. This integration process calculates the lighting and fog effects for every pixel in the fragment shader on the GPU. The operations performed at each step are as follows:
  1. Sample the indirect area lighting term from a 3D texture to get the ambient color at this point. 
  2. Check the shadow map 2D texture at this point to see if there is direct lighting from the sun.
  3. Evaluate a 3D noise function to determine the smoke/fog density at this location.
  4. Combine all of the terms to compute the change in color at this step using the equations:
    sample_color = ((indirect_light + direct_light*shadow_term) * fog_color);
    color = prev_step_color*(1-fog_density) + sample_color*fog_density;
The color starts out as the lit scene pixel color. If there was no fog (fog_density=0), this is the color returned. Higher fog density will replace more of the original color with the lit fog color at each step. This method accounts for light scattering to a first order approximation with exponential falloff. It works well and produces some nice results, but is very slow. Here are some screenshots showing fog in the Crytek Sponza Atrium scene.

Dense volumetric fog with shadows in the Crytek Sponza Atrium scene.

Sponza Atrium with fog, half of it in light and the other half in shadow.

Here I'm using a 128x128x256 indirect lighting texture, a single 4096x4096 shadow map texture, and a screen resolution of 1920x1080 (1080p). I'm taking 3 samples per lighting pixel, which can be more than 200 samples per pixel but is on average much smaller. I get around 20FPS with all effects enabled. The framerate increases to 40-50 FPS at 1280x720 (720p), which is more reasonable for a realtime game. Most of the time is taken by steps 1 and 2. If I reduce the number of steps/samples, the framerate improves significantly, but the quality degrades and some rendering artifacts start to appear. If I reduce the indirect lighting or shadow map texture resolution, the framerate will also improve, at the cost of more noise and less lighting precision. Blocky lighting doesn't look very good.

Here is another screenshot that shows how important the indirect lighting term is. The fog near the fire on the right glows with an orange hue. If I remove the indirect term, the fog will be black, which looks very wrong. The fog on the left side is brighter due to indirect lighting from the sun in the open courtyard. You can also see the shafts of light in the back center of the image where the sun shines through the space above the curtains.

Volumetric fog with direct sunlight + shadows, and indirect lighting from the fire on the right.

The previous images all used a constant fog density. 3DWorld can also use procedural 3D Perlin noise to generate time-varying, nonuniform fog density. This looks more like smoke that slowly drifts across the scene. I used 3 noise octaves, which seemed to be a good balance between runtime and quality. The additional three 3D texture lookups add significant overhead to the fog computation time, and reduce the framerate by about 20%. But, it does look much nicer. Here are some screenshots.

GPU-generated volumetric smoke that moves/flows dynamically and is light by both indirect and direct light with shadows.

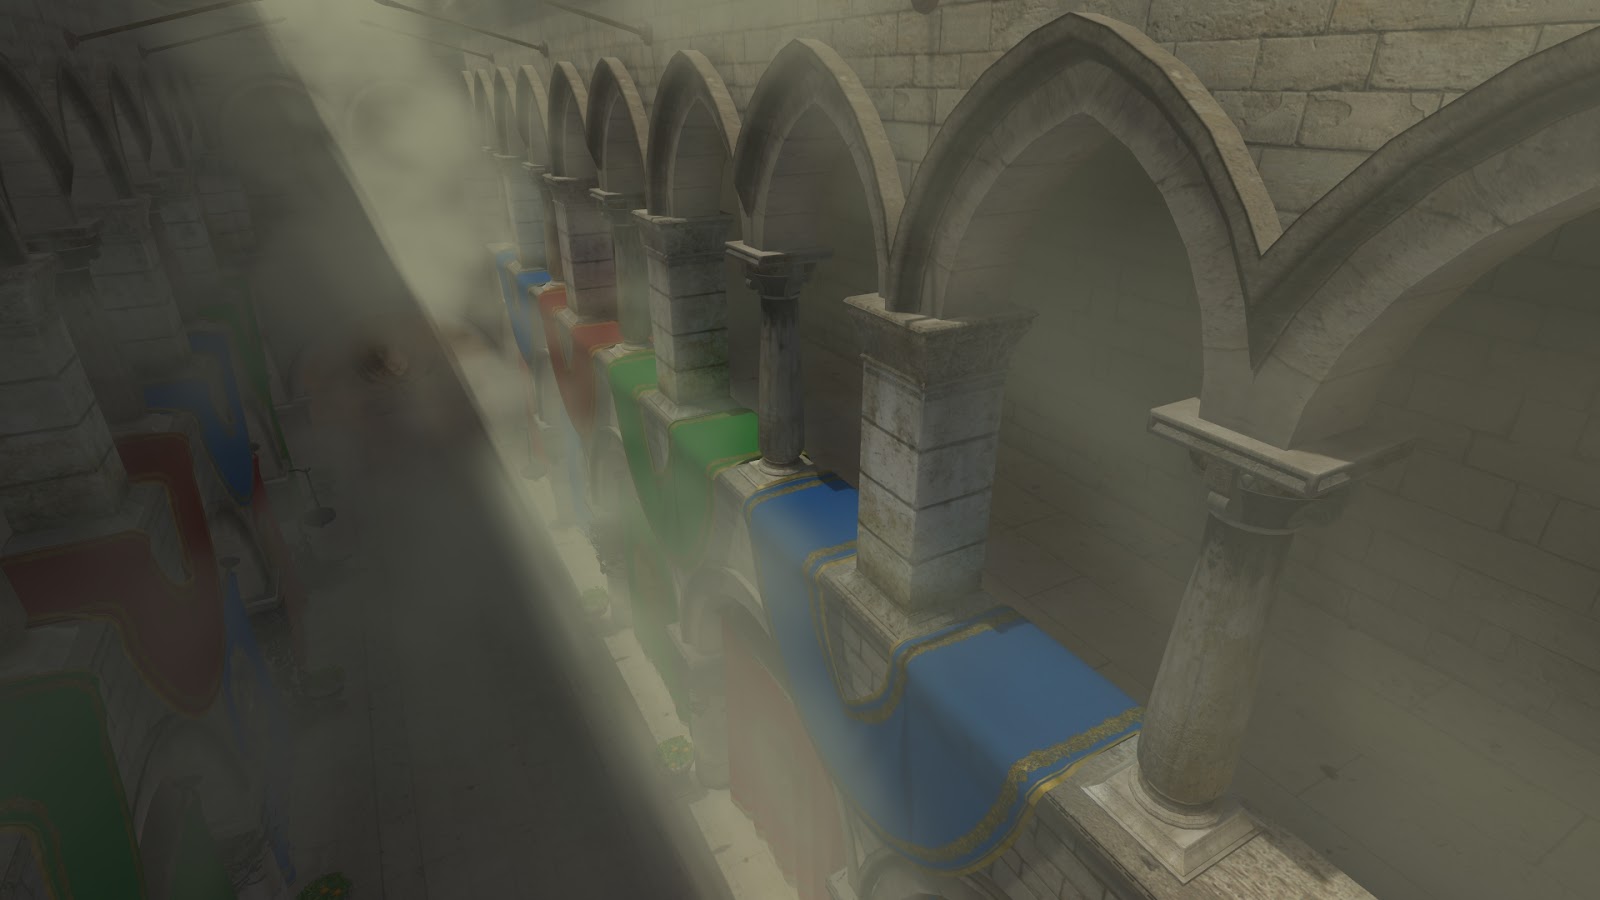
Dynamic volumetric smoke, lit by a shaft of sunlight, viewed from above.

Volumetric smoke with shadows and light shafts.

Finally, here is a video showing how the smoke moves over time. The camera is motionless; only the smoke is moving.


3DWorld also has a smoke diffusion model that can be used in gameplay mode. Some of the weapons produce smoke, and others create fire, which also produces smoke. The smoke is diffused though a 3D volume with collision model blockers on the CPU. Then the volume data is sent to the GPU for use in rendering. I may make a blog post on this topic later.

I would like to use this effect for some game content, but it's not clear if the performance/quality trade-off curve has any useful points. It's either too slow, or the quality is not good enough. Still, it's a nice demo effect, and fine for small screen resolutions. I'll have to look into some possible optimizations. I've read that randomly distributing the same points reduces the rendering artifacts but produces noise. Maybe the results would be more acceptable? In some cases a screen-space blur can remove most of the noise, but it's not clear if the 3DWorld framework can do this blur correctly in its current form. Maybe I'll experiment with this later.

Wednesday, April 13, 2016

Animals in Tiled Terrain Mode

I just got back from my trip to Spain, and it's time to write another blog post. I guess I'm done working on reflections in 3DWorld for now, so I've moved on to other features. You won't see as many fancy screenshots in this post.

I've wanted to make infinite tiled terrain mode more interesting for a long time. I have first person shooter gameplay in ground mode, but that's just a small map area. Tiled terrain mode is a much larger area (infinite!), which makes it more difficult to place interesting items and to fight enemies in. I needed something to make it feel more alive, even if it's not really part of gameplay.

My first thought was to have animals jump out of the water, grass, and trees at the player, maybe make it some sort of hunting game - either the animals hunt the player, or the player hunts the animals. I decided to start with some simple animals that should be easy to create: fish in the water, and birds in the sky. The general idea is that they don't have to be highly detailed models since they won't be viewed from up close. Fish can swim away when the player gets too close. Birds are high in the sky where the player can't get to unless flying mode is enabled. This means that I can concentrate on the AI behavior (which is fun) rather than create detailed models (which is slow and tedious, and requires software that I don't have installed).

The general theme of tiled terrain mode is that all tiles are self-contained cubes laid out in a uniform sized X-Y grid that extends 10-12 units in all directions around the camera/player. Tiles extend in Z from the lowest point in the ocean to somewhere above the clouds. As the player moves, new tiles are created when they come into view distance range, and old tiles are deleted when they're far enough away. Everything is contained in the tiles: terrain, water, trees, grass, rocks, clouds, etc. It makes sense that animals should also belong to tiles. This allows animals to be created or "spawned" when new tiles come into view, and distant animals can be deleted when tiles fall out of the view area, so that the number of active animals is roughly constant.

The problem is, animals aren't static like the rest of the scene. They move. When an animal crosses its containing tile's boundary, it's removed from one tile and added to another tile. This complicates things, and means that my custom, high precision coordinate system doesn't work correctly for animals. An animal's location can't be relative to a tile's local coordinate system if it doesn't belong to a single tile. I haven't quite solved this issue. I suspect that when the player walks far enough away from the origin, the animals will begin to have jittery movements as floating-point error accumulates. However, I haven't actually noticed this problem, maybe because the fish and birds are far enough away. So for now I'll ignore the issue.


Fish

Fish and birds are generated within each tile. I decided on a max of 12 fish per tile and 2 birds per tile. For each tile, 12 fish xy locations are generated, and the mesh height is calculated for each position. If the mesh point is under the water, the fish is kept. A z-value (depth) is randomly chosen for that fish between the mesh z-value and the water surface z-value. The fish can move in the xy plane but stays at this constant depth/z to simplify the collision detection and AI logic. Fish swim in a straight line and occasionally make small adjustments to their directions. If they collide with the mesh, they choose a new direction to move in. If they get too close to the player, they turn around and swim away. This produces a natural looking behavior.

Fish need to perform collision detection with the mesh under the water surface each frame when they move. For procedurally generated simplex noise meshes, that requires evaluating the noise function one or more times per-fish per-frame. With 400 generated tiles, and 12 fish per tile, that's 4800 updates per frame corresponding to 6000-8000 height evaluations of 8 octaves of simplex noise per frame, which takes many CPU cycles. Normally, the noise is evaluated in parallel on the GPU. This doesn't work for the scattered, random position evaluations of fish. Evaluating it on the CPU has a noticeable impact on frame rate, which was reduced from 300 FPS to 130 FPS. I decided that there was no reason to move fish that were miles away from the player and not even visible. Reducing the simulation distance to some 100 feet reduced the number of "active" fish to 10-20 and completely solved the problem.

I originally thought that fish would be easy to simulate and draw. I could have them swim away when the player got close, preventing them from being viewed close-up. That way, they could be drawn as simple untextured ellipsoids (non-uniformly scaled spheres) that faded into the water color at a distance. Later, I realized that it was possible to corner fish in shallow water so that they couldn't swim away from the player, allowing the player to get very close to them. The ellipsoid shape just didn't work. In the end, I had to find a textured 3D fish model on TurboSquid and figure out how to integrate that into the world. This is the first time I had to add support for dynamic imported 3D models with arbitrary translation, rotation, and scale transforms. They still blend into the background water color with distance, to simulate a fog effect for murky water.

In the end, the fish models worked well. They weren't animated models, so the tails and fins were static, but that didn't seem to matter too much. Here is a screenshot of some fish under the water, taken with the camera positioned in the air above the water. Normally, the fish will swim away at this distance, but I temporarily disabled the fish AI to prevent them from moving.

Fish viewed from above the water surface.

Here is a screenshot of fish viewed from underwater.

Fish viewed from underwater.

Birds

I originally thought it would be difficult to make birds look natural and real, but birds were actually easier than fish to draw. They're viewed from a distance, so their model didn't need much complexity. I was able to get away with making birds plain black, formed from three ellipsoids representing their body and two wings. The wings of each bird are animated using a simple sine wave for up/down motion. They fly with a constant velocity in the xy plane, with an altitude/z-value randomly between the top of the highest mountain and the bottom layer of puffy clouds. Birds move in slowly varying random directions that form wide curved paths, keeping them from quickly flying out of view. These wide curving paths seem to make believable flight paths.

Birds cross through tiles relatively quickly, since they move at higher speeds than fish (and the player). The birds that cross the final edge tiles that have no generated neighbors are gone forever. I suppose if you stay in one place watching the birds for a long time, eventually they'll all fly away. However, it seems like when I look at them for minutes their numbers aren't even reduced noticeably, so it may take closer to an hour for most of them to fly away.

The birds fly above the highest peaks, so no collision detection is necessary. It might be more realistic to have them take off from and land on trees (if trees are even enabled), but that seems much more difficult. I haven't implemented collision detection with the tree crowns/leaves yet, only the trunks.

Here are two screenshots of birds flying in the sky. Note that they can fly in and out of clouds. Since clouds are volumetric, the birds alpha blend with them correctly. This likely doesn't happen in nature, except for some of the high flying species of birds (or very low clouds).

Birds flying in the sky, controlled by steering AI.

Birds in the sky, flying in and out of the clouds.

Here is a video showing birds flapping their wings and flying through the sky. Somehow YouTube didn't ruin this one with compression artifacts - I wonder what I did differently this time?


I'm thinking of adding bees and butterflies next. These would be similar to birds, except that the player can get closer to them so they need to have a more detailed drawing model. Also, they will need to do some sort of collision detection with trees and flowers. 3DWorld already has basic collision detection for some of the scenery, though it would be slow for a large number of insects.

Maybe I can also add spiders that fall out of the trees when the player walks under them. They can come down on webs and then walk around on the ground. I'm not sure how difficult it would be to animate a spider's legs, but it sure would be scary!

Wednesday, March 16, 2016

Cube Map Reflections - Part 3

I originally planned on making only a single post on cube map reflections. Then I had so many images that I decided to split it into two posts. Surely, two posts was enough, right? Well, I worked on reflections some more, fixed some problems, added new features, and now I have even more images to show. So here goes Part 3.

For this post, I'm going to list the different problems I had run into and how I solved them. These are mostly the "future work" items from the previous post. I think I have everything more or less worked out now, except for a few minor issues.

Dirty/Imperfect Reflections

This is actually related to planar reflections, not cube map reflections, but the topic is close enough. Someone commented that the reflections in the floors look too clean and perfect. Real floors are scratched, chipped, and dirty. I put a bit of effort into adding support for specular maps into the reflection rendering pipeline so that I could have more realistic surfaces.

My first screenshot shows the museum scene with a scratched floor, using a scratch map found here as a specular map texture. This gives the impression of a floor that has had many large objects pushed across it, damaging the smooth wax coating.

Scratched and scuffed reflective marble floor using a specular map in the museum scene.

Next, I changed the floor of the Crytek Sponza Atrium scene to a dirty and chipped metal material. I tweaked the parameters until I found something I liked.

Dirty, chipped, reflective metal plate floor in the Sponza scene.

Large Numbers of Reflective Objects + Mipmaps

This section involves two different topics. In the previous post, I commented that 3DWorld should scale to over 100 reflective cube map objects, and possibly up to 180. In reality, the max is around 120. I'm not sure why it's lower than I thought. Maybe some memory is needed by MS Windows, or maybe there is allocation overhead or fragmentation. After that (120 spheres) it starts running out of GPU memory and the frame rate drops from ~100 FPS to ~2 FPS. The time to generate reflections increases from a few seconds to a few minutes, and it's not even interactive to view any more.

When there isn't enough GPU memory available, 3DWorld doesn't crash. Instead, the graphics driver starts allocating from system memory (CPU side RAM). I have 16GB of memory on this machine, so it's not going to run out any time soon. Unfortunately, reading from system memory is very slow compared to reading from GPU memory, since the data needs to travel across the motherboard, etc. This really hurts performance! I've seen this effect on both my older machine with an ATI card an on my new machine with an Nvidia card.

So, here is the scene with 100 reflective metal spheres, drawn in realtime after waiting for a few seconds for the inter-reflections to converge.

100 shiny metal spheres reflecting each other and the surrounding environment in realtime.

The reflections look very noisy if you zoom in. There is no filtering or antialiasing. This is related to the lack of mipmaps that I commented on in my previous post. It turns out that the reason mipmaps didn't work was because I wasn't allocating memory for them during texture creation. This was easy to fix. But mipmaps take around 33% additional GPU memory to store, and 100 spheres is slightly too much. The framerate is 2 FPS again! Fortunately, everything works just fine when I reduce the scene to 80 spheres, and the reflections are nice and smooth. Note that I had to enable 4x anisotropic texture filtering to fix the smearing near the cube map borders and the edges of the spheres. I was expecting this to hurt frame rate, but it actually had no measurable effect. Take a look at the screenshot:

80 metal spheres using mipmaps for smooth, antialiased reflection images.

Refraction

I made an attempt at implementing refraction for transparent materials in my cube map reflection shader. It's not much different from reflection, only some changes to the math involved in the cube map direction lookup. Basically, the rays refract instead of reflect, which amounts to calling a different build-in GPU function. In fact, there are both reflections and refractions involved, depending on the view angle, so you can see some reflections near the object edges. Here is a screenshot of a refractive sphere.

Transparent glass sphere with index of refraction of 1.5 showing inverted refracted image.

Yes, the refracted image is upside-down, and yes, this is correct. Take a look at a reference image. However, the refraction isn't entirely correct. There are at least two sources of error:
  1. The rays used when creating the reflection image are parallel to the cube map image plane, and the view rays for reflective objects are still mostly uniform and parallel. On the other hand, the refracted rays are no longer oriented in a nice grid facing parallel to the surface. The refraction bends the rays around so that they come out at all sorts of odd angles. Since there is no depth information in the cube map, there is no way to determine which objects the scattered rays hit. The distance of the plane used to clip and evaluate the rays affects the reflected image, which is incorrect. I used the view frustum near clip plane, which works okay for these scenes.
  2. There are really two refractions involved, not just one. The first one is viewer->surface, which is an air->glass refraction and is correctly modeled since the shader has the hit point. The second one is from the back side of the glass surface back out to the air. The shader can't evaluate this refraction because it doesn't have the 3D geometry and can't determine the point where the ray exits the glass. Only the first hit point is known.
I'm not sure how much these two sources of error affect the images. They may not be very significant, but I don't have a reference image so I can't tell for sure.

Here is another image showing refraction in a glass dragon statue. Note that the refraction of the blue and brown chair is probably larger than it should be.

Transparent glass dragon with approximate reflection and refraction.

And here are a reflective sphere, reflective cube, and refractive sphere together.

Mirror sphere (left), glass sphere (right), and mirror cube (front).

I experimented with normal mapped reflective objects, and came up with some very strange effects. I think the strength of the normal map may be too strong in some of the examples. Here is a screenshot of a partially reflective, partially transparent/refractive cube with a stucco normal map that looks somewhat like a rough block of ice.

Normal mapped reflective and refractive object that resembles a rough block of ice.

Dynamic Reflective Objects

I worked around the previous problems I was having when I tried to make dynamic objects reflective. Their collision objects are added and removed every frame, but as long as the reflection generation happens at the right point in the control flow it still works. The cube maps are recreated every frame, which is inefficient, but the overhead is small compared to the time taken to actually render the scene from 6 cube faces.

The problem of different shader usage was solved by adding a config file option that switched to drawing the collision model of objects using the respective shader rather than the dynamic physics model + shader. As long as I limited this to simple shapes such as spheres, both object models are close enough that this works.

Here is a short video showing me throwing a (bouncy?) reflective metal ball. The reflection changes dynamically as the ball moves. Sorry the framerate is jittery in this video. I tried to do 1080p video capture at 60 FPS, but the reflections are too slow and the frame rate varied randomly from around 30-60 FPS. Maybe I should have recorded it at a lower resolution, a lower video frame rate, or on a simpler scene.


Player Model

I haven't had a chance to work on improving the player model, and it's not in the scope of this post anyway. So here is a screenshot of the simple smiley face player model from last time reflected in the gold dragon. Note that the tile floor is also reflective. See if you can spot a reflection of the eyes and nose.

Player model reflection (red smiley face) in a gold dragon statue.

That covers most of the future work todo items from the previous post. I still have to make some optimizations to the cube map rendering to allow for more dynamic objects in the scene while still hitting the 60 FPS target. However, I may be out of new and interesting images to show. But who knows, there may be another reflection post in the near future.

Thursday, March 10, 2016

Cube Map Reflections - Part 2

Here is the second part of my cube map reflections post. This is going to be mostly images, and a few videos. Most of the work I've done since my previous post from a few days ago was just tweaking things and fixing minor bugs. Many of the issues were related to dynamic/moving reflective objects, which is one of the reasons I left the videos for this post. I also made some optimizations to the rendering, which is nice but still doesn't make scenes with multiple dynamic reflective objects render in realtime. On the other hand, reflections on static objects work just fine and cost almost no frame time. I can likely have over a hundred of these objects, assuming there is enough GPU memory, though I haven't tested a scene with more than 20 of them.

[For reference, each of the 6 cube map faces is up to 768x768 pixels of 8-bit RGB image data. That's 6*768*768*3 = 10MB of GPU data. My GPU has 2GB of memory, so I can have up to 200 reflective cube map objects if I use all of it. In reality, the rest of the scene needs around 200MB, so I can only have 180 objects max.]

To start off, here is the gold dragon, but this time in silver, with a few minor improvements.

Reflective silver dragon drawn in realtime.

I created a test scene with two rows of 8 reflective silver spheres. This was mostly for testing object inter-reflections, but also made for a good performance test. Dynamic rendering has to be turned on so that the nested reflections of other spheres are correctly created. It seems to converge after around 1-2 seconds, or 10-20 frames at 10 FPS. Once the images stabilize the rendering mode can be switched back to static to recover the realtime framerate for viewing the scene.

Gold dragon and 16 mirrored spheres reflecting each other in realtime (after several seconds of processing).

The reflections are close to physically accurate, and look like what you would get out of ray tracing. There are many levels of nested reflections of spheres within spheres. This works because each frame, the spheres are iterated over for creation of the reflection images of their 6 faces. In the first frame/pass, none of the spheres start reflective as their images haven't been created yet. They're just white spheres. On the second pass, the reflections are present, but they show the nearby spheres reflected as pure white. On the third pass, the reflection images pick up nearby spheres whose reflections contain other white spheres. This continues until the user stops the simulation, where each new frame increases the level of nested reflections by one. Think of it as simulating once bounce of light per frame. After a short period of time, the nested reflections become so small that the difference is not visible and the images no longer change.

[This reminds me of something. When I was a kid, I had a yellow bucket that I used for playing with sand and water. The bucket had a sheet of paper glued to it that had a picture of another yellow bucket. The bucket in the picture also had a (smaller) picture of a bucket on it. There were 4 or 5 levels of nested pictures of buckets that I could see. I always wondered how they created this (and why). This was back before the time of computer graphics, so it was probably done using cameras. Someone took a picture of a bucket, printed it, put it on another bucket, then took a picture of that ... repeated 4-5 times. Interesting.]

Here is another view showing how the gold dragon also reflects in the 16 spheres.

Closeup of gold dragon reflected in metal spheres.

Next, I changed the material properties of the spheres in the config text file, added a torus and a cube, and reloaded the scene. The new scene contains a combination of shapes, materials, and colors:

Various reflective materials and shapes. They even cast faint shadows on the floor.

The materials shown here are:
  • Gold dragon (center)
  • Silver torus (above) - not self reflective, sorry
  • Silver cube (on the floor in the back)
  • Marble spheres (left; front to back: black, blue, red, white)
  • Metal spheres (right; front to back: gold, brass, copper, silver)
I used real values for index of refraction and metal specular colors that I found online. Here is the scene from another angle.
Closeup of reflective silver torus and other shapes.

I added a reflective torus and some other objects to the Crytek Sponza atrium scene as well, to convince readers that this works on more than one scene. It should work on just about anything, including outdoor scenes full of grass and trees.

Reflective metal torus and other shapes in the Crytek Sponza atrium scene.

I made one of the metal cubes movable so that the player can push it around the scene. Every time the object moves, the reflection textures are regenerated so that they're always correct. I pushed the cube around the office building and into the basement to make sure the dynamic spotlights and shadows work correctly with it. Everything looks correct in this screenshot.

Movable cube casting a dynamic light shadow and reflecting dynamic lights and shadows

Someone asked me about the lack of player reflection in my previous post. Before I added reflections, there was no need to create a player model because it could never be seen. 3DWorld is a first person game engine (except for universe mode), so the camera is always at the position of the player's eyes and therefore can't see the player's own face and body. I decided that it would be nice to have a player model for reference, even if it was very simple. I used the smiley face enemy AI model because it was already available, but I'll likely replace it with something better in the future. The user can toggle drawing of the player model on and off. This is what it looks like:


Reflections of the player as a simple smiley face 3D model.

If you look closely, you'll see that the smiley is actually floating off the ground. This is because I have the camera height set higher than the AI enemy smiley height in this scene, as it feels more natural when walking around the building. That way, the player's eyes are actually above the desk and tables. The player model is a capsule shape rather than a sphere, but the visual model is spherical, so there is a mismatch.

Videos

I created some short videos showing off reflections with dynamic objects and view directions. The first video is of the camera moving around the reflective objects in realtime after the reflections have been computed.


The second video is of me pushing a reflective cube around the scene to show off the dynamic reflection updates. Note that the sun flare reflection wasn't working at this point, so the sun appears as a small yellow circle in the top of the cube.


Rendering Bugs

Here are some failed attempts at reflective sphere rendering. I'm throwing these in just for fun, because they looked silly and it took awhile for me to figure out what went wrong.

What do you suppose happened to this reflective sphere? Did someone wrap a leaf around it?

Reflection of a ... leaf?

This is what you get when enabling a specular map texture but not binding it to the correct texture unit. The specular map uses a leaf texture, which was the last texture bound to that slot from the previous tree rendering pass. Oops. This object doesn't even use or need a specular map.


What about this one? Surely this is how the reflection is supposed to look in a sphere, right?

Simulation of a micro black hole.
I had the wrong sign/direction for the reflection vector, and light was reflected into the center of the sphere rather than away from it. I encountered several variants of this bug while trying to make the shader code correct. Oops again.


Future Work

I wanted to add a video of me throwing a bouncy reflective ball, but I haven't gotten that working yet. The problem is that the ball uses a different type of physics enabled scene object than the other reflective items I've shown. Each ball is converted to a collision object (the type that can be made reflective) so that it participates in collision detection, but it's added and removed every frame. In fact, its collision model isn't valid at the point where the reflection images are created. A second problem is that physics objects aren't drawn with a shader that supports reflections. I'll have to come up with some solution to these issues later.

All of the images shown here have a high specular exponent and are very glossy. I haven't implemented low-gloss surfaces yet. The traditional way to do this is to filter the reflection texture down to a lower resolution, which blurs the colors together. The simplest way to do this is to use mipmaps on the GPU and select a mipmap level based on a material glossiness parameter. I would like to do this, but I haven't gotten mipmaps to work yet on my cube map render-to-texture flow. Maybe there is an online tutorial that can help me with this problem.

Another interesting effect to simulate would be refraction. Unfortunately, this seems difficult to get right without knowing the geometry of the material for computing the optical thickness effects, etc. I have it working somewhat for a sphere (most people wouldn't know it was wrong), and objects with smooth curved surfaces in general, but it doesn't work at all for cubes. I'll have to think about this some more.

Finally, I need to work on creating a better player model.

Monday, March 7, 2016

Cube Map Reflections

As promised in my previous post, I managed to get cube map environment reflections working in 3DWorld. It was more difficult than I expected, but in the end actually looks better than I expected. Part of the problem was that I kept running into graphics problems that were difficult to debug, such as cryptic OpenGL errors, shaders that didn't work, upside down images, incorrect lighting, half black images, etc. It's very difficult to debug graphics code, especially when you're trying to implement an entirely new system from scratch. There are some helpful tutorials out there such as this, but many of the online info is incorrect, outdated, or doesn't work on my OS/graphics card.

How do cube map reflections work? The scene is rendered for each of the six sides of a cube surrounding the object. Each cube side has a 90 degree field of view looking out from the cube center. This is similar to a 360 degree panoramic photograph created from 4 individual photographs, but in addition has the top and bottom faces that you would get by taking a picture of the ground and the sky. Together, the six faces generate an image that covers all possible directions from the center of the cube. Each image is created by rendering the scene once and caching the resulting image as a texture on the GPU. This is a slow process, but only needs to be done when the reflective object moves or something in the scene changes. The texture images are then used to look up the reflected color for each pixel of the object in the fragment shader. The reflected view vector is used to index into one of the pixels in one of the faces based on the ray direction.

If the background of the scene, the "environment", is sufficiently far away from the reflecting object(s), the same cube map can be used for the entire scene. This is called environment mapping, and the cube map textures form a skybox. It works well for the sky, clouds, and distant mountains, but not as well for building interiors. The problem is that the parallax looks incorrect when the camera moves around the object. Also, the reflections of nearby objects appear more distorted. Therefore, for the scenes I'm using in 3DWorld, I had to create a separate cube map for each reflective object.

I'm attaching a lot of screenshots to this post. In fact, I have so many screenshots that I'll need to split the post into two parts. Keep in mind that everything is rendered in realtime even when the player/camera are moving. The scene and reflective objects can move as well, though the frame rate drops to 40-60 FPS with one reflective object as the scene is rendered up to 8 times (normal scene, 6 cube faces, and reflective floor). Actually, I cheated a bit and skipped drawing of the cube faces that are oriented away from the camera, which isn't always legal (but mostly works for convex reflectors).

I initially put all reflective objects in the same place in the scene so that the screenshots can be compared with different materials. Later screenshots will show more variety. I really just want to get the materials and reflection vectors correct to start with. The office building scene is one I've shown many times before. I put the reflective object above the desk in the lobby. The floor is partially reflective tile, the ceiling is a grid of white and brown, and the walls are white with some tan. The windows and doors are mostly transparent so that the player can see outside.

My first test used a traditional perfectly reflective metal sphere, like a large ball bearing. Here is how it looks when viewed from up close:

Metal sphere with a perfect mirror reflective surface (pure specular reflection).

Later, I realized that the reflection vector was incorrect. I updated the metal sphere image since it was the most incorrect, but didn't update the others because the images changed very little. Here is the new screenshot, with a sphere that extends slightly below the desk so that you can see the reflection of the inside of the desk. I was moving it around and didn't get it back into the original position.

Reflective metal sphere with corrected reflection vector resting on (and partially inside of) a desk.

Note that the tile floor reflections are shown in the sphere reflections, though I don't think it's quite right. It looks like the floor is reflecting the sky instead of the building interior. I'll have to work on that later. [Update: I figured it out, it's a transform matrix problem, but it's not so easy to fix.] Also, the player has no model and therefore creates no reflection.

Next, I changed the metal sphere to a dielectric material. Here is a giant glass marble, using real material parameters (index of refraction, etc.) and a Fresnel reflection equation. Only the edges of the sphere that are viewed at a glancing angle are highly reflective. This is physically correct - try it yourself at home.

White reflective dielectric sphere (smooth marble).

Here is the same sphere, but this time it's black and viewed from the other side. The effect is similar, and there is an additional white specular reflection from the ceiling light near the top of the sphere.

Black reflective dielectric sphere (smooth marble).

I then added some dynamic light sources to test out reflections from dynamic objects. The addition of dynamic objects reduces the frame rate, but it's still realtime.

Black reflective marble sphere with dynamic light sources creating specular highlights.

There are 100 floating, moving, colored lights in this scene. Several of the nearby lights create specular highlights on the sphere, and some of the lights behind the player are visible as reflections. You can also see the reflection of the chair that's directly behind and below the camera, and the table with bottles on the left side of the sphere.

Okay, it's nice to have reflective spheres. But what about real objects? The objects I want to use in 3DWorld are more complex than simple spheres. One likely candidate for a reflective object is the gold Chinese dragon that I placed on the desk in the lobby. I've had that statue sitting there on the desk for months and every time I look at it, I think, "That should be reflective." Well, it finally is!

Reflective gold dragon statue (871K triangles).

The dragon model is 871K triangles, which shows that reflections can be applied to an object of high complexity. I have no idea what the reflections should look like here. Fortunately, I spent all that time making reflections correct for simple spheres and cubes, so I'm pretty confident that the dragon reflections are at least somewhat correct.

Wait, I didn't add any reflective cube images? Well, they're not very interesting, they're basically just mirrors. I did add a reflective cube that the player can push around the scene. I'll add a video of that to a future post.

Note that the reflective object is concave, but is not self-reflective. One part of the object is not reflected in another part of the object. I ran into too many problems with the object intersecting the near clipping plan and had to move the near plane out beyond the furthest vertex of the object. Maybe some sort of back face culling would have helped, if all of my models actually had the correct face orientations. That's too much to expect from free models that I found online.

Here is another view of the gold dragon, during night time with some dynamic floating lights. This is still rendered in realtime.

Reflective gold dragon with dynamic floating lights.

For some reason, only the green lights like to float near the dragon. Here is a closer view with at least one green light reflecting off the gold. Someone must have put a lot of effort into keeping this dragon shiny by cleaning it every day.

Closeup of gold dragon showing specular reflections from a floating green dynamic light.

The dragon statue material can also be changed. Here it is in white marble.

Ceramic dragon with Fresnel surface reflections from the environment.

 And here it is in black marble.

Black glossy ceramic dragon lit only by reflected specular environment lighting.

The white lines near the silhouette edges of the dragon are actually a form of specular aliasing. The view vector is nearly tangent to the surface at those locations, which makes the Fresnel reflectivity approach 1.0 (mirror reflection). In addition, the triangles in those locations come together at sharp edges with high frequency noise, so their normals change very quickly. This makes the reflected rays bounce around randomly. Many of the rays hit the bright white walls and ceiling, creating bright white spots (pixels) in those locations. I'm not sure how to remove those artifacts, or if they're real physical effects. I don't happen to have a shiny black marble dragon around for reference. I could clamp the max specular reflection value, but that would break the properties of my metal mirror surfaces.

I think the small white spots on the dragon are triangles that have incorrect orientation so that their normals have the wrong sign. I've seen those on other images but they really stand out with the shiny black material. I'm not sure how much effort I want to put into fixing this, considering it only occurs in this combination of material and model. I guess I better make the dragon white or gold in the final scene.

I think 10 screenshots is enough for this post. I want to make sure the page doesn't take too long to load for those of you on mobile devices or slow internet connections. I'll make a follow-up post with more screenshots of multiple inter-reflecting objects, reflections in other scenes, and possibly some videos. I'll also try to include a section on "future work".

Monday, February 29, 2016

More Reflections

I can't get enough reflections in 3DWorld. They really bring life to the scenes. I recently added reflective surface support for horizontal "floor" polygons of imported models. The fragment shader enables reading from the reflection texture for fragments with z-values within the z-range of the reflection plane. Other than that change, the rest of the reflection texture creation works like I explained in my previous post.


Here is a screenshot showing the reflective marble floor from the Crytek Sponza atrium scene. You can see the reflected colored curtains and fire in the floor.

Realtime reflections on the shiny marble floor of the Crytek Sponza atrium.

I also added support for multiple reflective z-planes so that more than one floor can be reflective. The active reflective surface is selected as the one with z-value closest to the camera position from the visible surfaces below the camera. Surfaces above the camera are ignored because the system assumes only the top of the objects are reflective. Here is a screenshot showing reflections on the upper floor of the Sponza atrium with some moving dynamic light sources.

Reflections of the scene and some colored lights on the upper level of the Sponza scene.

I made the marble floor of the museum scene reflective as well. It makes the scene look much more realistic. Take a look at the way the windows look reflected from the floor.

Reflections on the marble floor of the museum scene.

Here is the museum scene shown from a different viewpoint where the dinosaur skeletons are visible.

Another view of the museum scene showing the reflective floor.

I'm currently working on cube map reflections for small placed reflective objects such as the golden dragon in the office building scene. Cube map reflections are more difficult than planar reflections because they need to be rendered from all six sides of a cube rather than a single reflection plane. It's probably too slow to generate all six cube face images each frame for large scenes, so other tricks need to be played. For example, if the scene is static (no moving objects), the reflection images can be rendered once as preprocessing rather than per-frame. I'll make another post if/when I get this working correctly.

Thursday, February 18, 2016

Overhead Map View

This past week I have been making improvements to 3DWorld's overhead map view. This was originally a low resolution, cartoon-ish overhead view of the entire level that showed the level bounds, player position and direction, enemy positions, and item locations. The player can zoom in and pan around in the image interactively using the arrow keys.

I decided to add some improvements to the original system that I wrote many years ago. First, I added mouse wheel zoom and mouse click-and-drag for a "slippy map" interface that works like Google Maps. The update rate of map view is somewhere between 10 and 30 FPS, which seems to be okay for a drag-able map.

Each pixel of the map is computed independently. The colors are determined from a height-based table lookup and match the normal colors you tend to see in maps: blue for water, brown for dirt, green for vegetation, gray for exposed mountain rock, and white for snowy peaks. I added sun lighting by computing the normal at each pixel to make the peaks and valleys stand out more. Here is what this view looks like for a procedurally generated island scene. The player is located at the red dot in the center facing in the direction of the black dot.

Map view of an island with correct lighting applied, which produces mountains that look 3D.

This approach works for heightmap textures as well. The user can interactively pan and zoom within a high resolution heightmap and view a pseudo-colored image of the terrain. It works just like an image viewing tool. In the following screenshot, I used the 16K by 16K pixel Puget Sound heightmap dataset available here.

Overhead map view of Mount Rainier from the 16K x 16K pixel Puget Sound texture with real lighting.

Note that interactive heightmap editing done in 3D mode will automatically update the overhead map view. Some of my custom height editing can be seen in the area around the player on the left. Those small lakes and green peaks aren't in the original heightmap dataset.

Here is a video where I pan around the Puget Sound heightmap and change the sun position/direction to prove that map view really does compute per-pixel lighting. The sun moves slowly because I use a keyboard key to move it a few degrees per key press.


Next, I added ray tracing of each pixel to pick up all of the other scene objects, and another ray toward the light source to generate shadows. I'm getting around 20M primary rays per second throughput on a 4 core CPU using OpenMP, which makes it interactive. I was getting over 30M rays per second during snow coverage map creation from the previous post, so this isn't quite as fast. I suspect the slowdown is due to cache misses looking up the texture data for each hit point on the scene geometry. I didn't need this extra step when creating the snow coverage map. When the view is zoomed out this far, texture samples are spaced pretty far apart, making the texture access pattern pretty random. Texture aliasing artifacts can be seen in the screenshot below. The small red/yellow and blue/yellow circles are red and blue team AI players.

Ray-traced overhead view of building scene with shadows enabled in gameplay mode.

You can see some shadows cast by the buildings and trees here. I'm simply darkening the pixels in the overhead image when the sun is not visible from the primary (vertical) ray hit location. Shadows are enabled by default, but they add additional runtime. Shadow rays are faster to compute than primary rays because the search can terminate as soon as an intersection is found. However, they're less coherent, especially near complex surfaces, and that adds to the query time.

The results remind me of old sprite-based top down PC games and some of the simple phone/tablet games I've played. Here is another screenshot, this time of the house scene. The trees cast shadows on the ground and the rest of the scene. This scene uses a custom heightmap which is not drawn in map mode, so all terrain is green.

Ray-traced overhead view of house scene with shadows enabled in gameplay mode.

Overall, this was a fun side project. It doesn't look as good as what I could have drawn on the GPU, and it's much slower to compute on the CPU, but it does show off 3DWorld's ray-tracing support. It's just a different way to approach the problem. There are other benefits, such as improved ability to debug the collision volumes, ray tracing code, object placement, etc.