I've finally gotten around to implementing proper skeletal animation for the 3D models of people in 3DWorld's cities and buildings. This involved completing many different steps along the way. I'll discuss my process here. This will be a relatively short post with lots of technical details, so fee free to play the videos at the end without reading the text. I'll add links where I can to articles that explain these concepts and give more info.
First, I had to write a wrapper for importing models using Assimp because my built in loaders only support the OBJ and 3DS file formats, and these don't store animations. This includes adding support for reading embedded textures as found in the FBX file format. The basic OpenGL/Assimp tutorial was useful for this, but only explained how to import simple static model geometry. If anyone is curious, my model import code can be found here, and the model rendering side of the code can be found here.
I originally had no idea how to load and use model animations, so I found a GitHub/YouTube tutorial series and another blog post that showed how to implement the matrix transforms with GLM. This took many attempts to get right because the code from those tutorials wasn't easy to integrate into 3DWorld's existing rendering system. I also ran into issues with the coordinate system used (I use Z as up rather than Y) and bounding cubes of animated geometry. Getting these things right required quite a bit of trial-and-error, including generating text logs of coordinates and transforms that I had to manually review. I guess that's to be expected when trying to learn multiple new things at the same time.
I used 3DWorld's model viewer scene config for working with Assimp model loading and experimenting with animations. This view shows a single model with nothing else other than the sky background. It's much faster to load than the city/buildings scene. I was able to compare my results with the 3D Viewer application that comes with Windows, which supports loading/drawing embedded textures and animations. In addition, I took advantage of 3DWorld's hot reload of OpenGL shader programs while debugging to get the GPU side of this correct.
The models and animations I used for this were found on Adobe Mixamo, which is free but requires creating an account. While my code worked fine on the md5mesh model used in the tutorial, all of the Mixamo models looked very wrong when animations were enabled, with curvy legs and arms bent in the wrong direction. For example:
Is it my imagination, or is something wrong with the animations here? For some reason, this model doesn't look like the one on the website.
It turns out that the problem was due to a known bug in Assimp. This took me many hours to figure out. What's particularly annoying is that the version of Assimp I have on linux doesn't have this bug, it's only present on Windows. This is why I never came across it while working with the tutorial project on linux.
I replaced the four static models I was using for people in 3DWorld with five new animated people models. (Well, technically I was animating the original models in the vertex shader, but only their legs moved.) Here's a YouTube video showing the final results with five different models using walking animations.
That looks pretty good for regular people. But what about gameplay mode? We need to add some zombies, and I can finally get proper zombie models and animations. They definitely make building gameplay mode much more frightening!
That's all I have for today. The next step is to store/use multiple animations per model. I need at least an idle standing animation for people. They currently stop mid-walk with one leg up in the air, which doesn't look very natural. I can't revert to the non-animated version when stopped because these models all begin in a T-pose with their arms straight out to their sides.
It's time to get back to writing some AI logic for buildings. I wrote a system for building AI people to use stairs a year or so ago. Then last month I added support for ramps such as those found in parking garages so that zombies can follow the player to more locations. Now, I've written the logic for AIs to use office building elevators.
But why? Well, it seems like an interesting challenge. I'm not aware of any current games where the AI can properly use a fully functional elevator. I've seen simple bots that can ride an elevator up and down between two floors. I've seen AI companions that can follow the player into an elevator, such as in FNAF Security Breach. And I've also seen scripted cut-scenes where a NPC (non-player character) will use an elevator. I've definitely never seen a game where both the player and AI can use an elevator that goes between more than two floors, and specifically where multiple AIs can co-use the same elevator with different destinations.
There are also some gameplay reasons to have AIs use elevators. Previously, it was always safe for the player to escape zombies by calling and jumping into an elevator. The player could even hide from zombies in an elevator because they treated them as colliders and wouldn't enter the car. Now it's no longer safe to escape through an elevator. Maybe the doors will open and a zombie will be inside, or maybe a zombie will be waiting to enter the elevator as it stops on a floor. There's definitely some risk now in elevator usage. This is good, as it makes the game more unpredictable and surprising for the player.
Building AI Behavior
3DWorld's elevators and building AI people are entirely separate and can only interact with each other through button presses and sensors. Both run internal finite state machines, have timers to trigger various future events, and support animated motion. Therefore, I can implement this by writing proper elevator usage for the AI and proper behavior for the elevator as two separate tasks. Elevators can currently be used by the player, so I can keep this simple behavior to start with and update the AI to use elevators through the same button interface as the player.
The first step is to decide if the AI wants to use an elevator based on a random dice roll. If so, we find the nearest reachable elevator, in case there are multiple elevators in the current office building. An elevator destination isn't available if this person is in some area such as a basement that can only be reached by stairs. The AI will also choose a destination floor that's reachable by the elevator and not equal to the current floor. Then the path goal is set to a point in front of the elevator doors near the call button(s). Once the person has reached this point, the correct call button is pressed to summon the elevator to that floor. When it arrives and the doors are fully open, the person can enter, turn, and press the destination floor button. When the elevator arrives at the destination and doors are fully open, the person can exit to a point in front of the elevator, and then select a new non-elevator destination. The elevator itself takes care of moving between floors and opening and closing doors so that the person AI doesn't need to worry about this.
It was challenging to get this system working properly. One common failure mode involved people getting stuck somewhere or in a state that they couldn't get out of due to the interactions of other AIs or failed elevator behavior. To prevent this, I added a maximum wait time of 60s for people. If the elevator doesn't arrive in that time, they give up and select a new non-elevator destination. This may result in elevators stopping at floors where no one is waiting, but I guess that's realistic.
Here's a video showing an AI person using an elevator at this stage. I follow this person into the elevator but don't interact with it myself. I haven't made the elevator lights update for people yet; this was added later and will be shown in the next video.
This system works fine when there's only one AI using the elevator. It
breaks down when another AI, or even the player, tries to use the same
elevator. This is because my elevator controller is too simple. It only
keeps track of the most recent destination floor button that was
pressed, and ignores the current up vs. down state of the elevator. It's sort of like a remote controlled car that is only
intended to be used by the player. It will go up and down as the player
desires and can change direction at any point. Our simple elevator controller
isn't up for this task and must be rewritten.
New Elevator Controller
The new elevator controller must use a queue to track call button presses and execute them in the order they were activated so that the first person to press a button gets the elevator. This isn't how real elevators work, but it's the simplest next step and moving in the right direction (pun intended). A simple call button queue is enough to fix the problem of the player getting into the elevator with the AI, pressing a different floor button, then having the AI get stuck when the elevator stops on the floor the player selected rather than the floor they expected. Now the elevator will first go to the AI's floor, where it will get off, before moving to the player's floor. This works similarly with multiple AIs trying to use the elevator, though there are still some issues. Well, many issues, as you'll see below. Now the player can get in and press all of the elevator buttons, and it really will tie up the elevator and trigger that 60s wait timeout for most of the people who are waiting. Just like in real life.
One problem is that a simple queue may result in the person in the elevator riding up and down following the sequence of call buttons pressed by others waiting for elevators. A real elevator controller will give priority to buttons pressed by riders from inside the elevator, so this is what I did. However, it does raise the question of whether or not the elevator is "fair" to all riders. For example, say someone is waiting on floor 1, but there's a steady stream of people going back and forth between floors 2 and 3 such that someone is always in the elevator. Does one of the floor 2 <=> 3 riders have to take an extra stop down to floor 1, or does the floor 1 rider have to wait forever? How does a real elevator behave? I'm actually not quite sure how my elevator works in that situation; the code has grown too complex to figure this out.
Next, there was the problem of elevators passing through called floors without stopping and constantly changing directions. Real elevators will stop on intermediate floors that have people waiting as they pass through them. I changed this as well, and things were working much better.
One more problem is that people were getting on the elevator when it was moving in the wrong direction. For example, they wanted to go up, and got on when the elevator was going down. It's not too big of a deal with only one elevator, but it does cause problems when I start introducing a maximum capacity for elevators (see below). This is another limitation of my simplified elevator controller: It was missing separate up vs. down call buttons. Once I added these, the elevator would pass through a floor without stopping if it was going in the direction opposite the call button. But now I had a problem where the elevator arriving on a floor that had both the up and down call buttons active would reset both states so that neither call button was active. Fixing this required tracking up vs. down calls as separate events and changing the queue to be able to split and merge them. In addition, I now had to track/calculate the next direction the elevator was to move after the stop so that I knew which call button state to reset. This took quite some time to get right, and at one point had a bug where elevators would get stuck on a floor with the doors repeatedly opening and closing in an infinite loop.
Multiple People in Elevators
Up to this point, people inside the elevator would simply stand at the center of the elevator car facing the doors and stack up on top of each other. I added a capacity value to elevators and started it at 1 to make things easier. This solved some problems, but now required me to handle people wanting to enter the elevator when it was at capacity. Here there are two cases to consider: whether or not someone was getting off on this floor. If the person was getting off, then the elevator had extra capacity, and I only needed to handle the two people crossing each other through the elevator doors. I used the common practice of having the person in the elevator exit first, then the person waiting enter the elevator. However, the person who was exiting would sometimes push the waiting person out of the way, and that person wasn't able to enter the elevator before the doors closed. The solution to this was to add door sensors that will open the doors back up when someone intends to pass through them. (Note that here I'm checking for the <enter elevator> state rather than checking that the person is physically between the elevator doors. This avoids needing logic for re-pressing the call button if the doors have fully closed by the time the person reaches them.) Similarly, since we're overriding the timing of the elevator, I had to add a new constraint that the elevator can't move until the doors have closed completely.
Now to handle the second case where the elevator arrives at capacity, someone is waiting to enter, and no one is exiting. There are two acceptable behaviors for the AI who is waiting. They can either give up waiting, select a new non-elevator destination, and walk away. Alternatively, they can continue waiting and re-press the call button once the elevator has left the current floor. If they were to immediately re-press the call button it would cause the doors to remain open forever. I think this is standard elevator behavior, at least when there are no explicit door open/door close buttons. This situation requires adding more timers and state to the AI state machine. In the end I couldn't decide which approach was better, so I had the AI pick one based on a random coin toss. This way a group of people waiting for the elevator will have a subset of them walk away if there's no space.
But that's not enough! One of the people walking away could either be stuck between others who are waiting, or will push someone out of the way, possibly through the walls of the elevator. Okay, the person being pushed now needs to actively move to avoid being pushed into the elevator. I don't know how to handle the case of someone getting stuck between others, so I guess for now they stay suck and will unintentionally wait for the elevator (in some mid-animation state with a foot up) until their neighbors either get onto the elevator or give up waiting and walk away.
I forgot about the case where people push each other around trying to get to the designated waiting area in front of the elevator doors. This is actually more likely to push someone into the elevator than the case above. While the resulting behavior will work all of the AIs out eventually, it makes a mess and looks unnatural. In reality people will form lines waiting, so let's do that. When a person bumps into someone who is waiting at the same elevator they're trying to get in, they stop at their current location and wait from there. That ... actually works really well. Ah, finally some solution to a problem that works and doesn't require solving multiple smaller or less common problems.
Wow, that was a lot of work! We're done, right? Not so fast. I haven't discussed how to avoid stacking people on top of each other when the elevator capacity is greater than one. The way I handled this for swarming rats was to check the destination of each rat against the destinations of all previous rats and assign it a unique position. The offset relative to the other rats was chosen consistently so that they moved as a formation. Unfortunately, I can't use this on people in elevators because they're not a coherent group. We have people incrementally entering and leaving the elevator, so we can't pre-assign everyone a slot. It has to be fully dynamic. The first person stands in the center. When someone else enters, the original occupant moves to one side and the new arrival takes the other side. That all seems reasonable, at least until we consider the case of people exiting. What if the person in the back needs to get off at this floor but someone is in front of them in the way? Does the person in front have to move to the side, or temporarily exit the elevator to let the person in the back out? Consider how complex this situation is in real life. I have no idea how to implement this in the code and I'll leave that for some later time. Moving on...
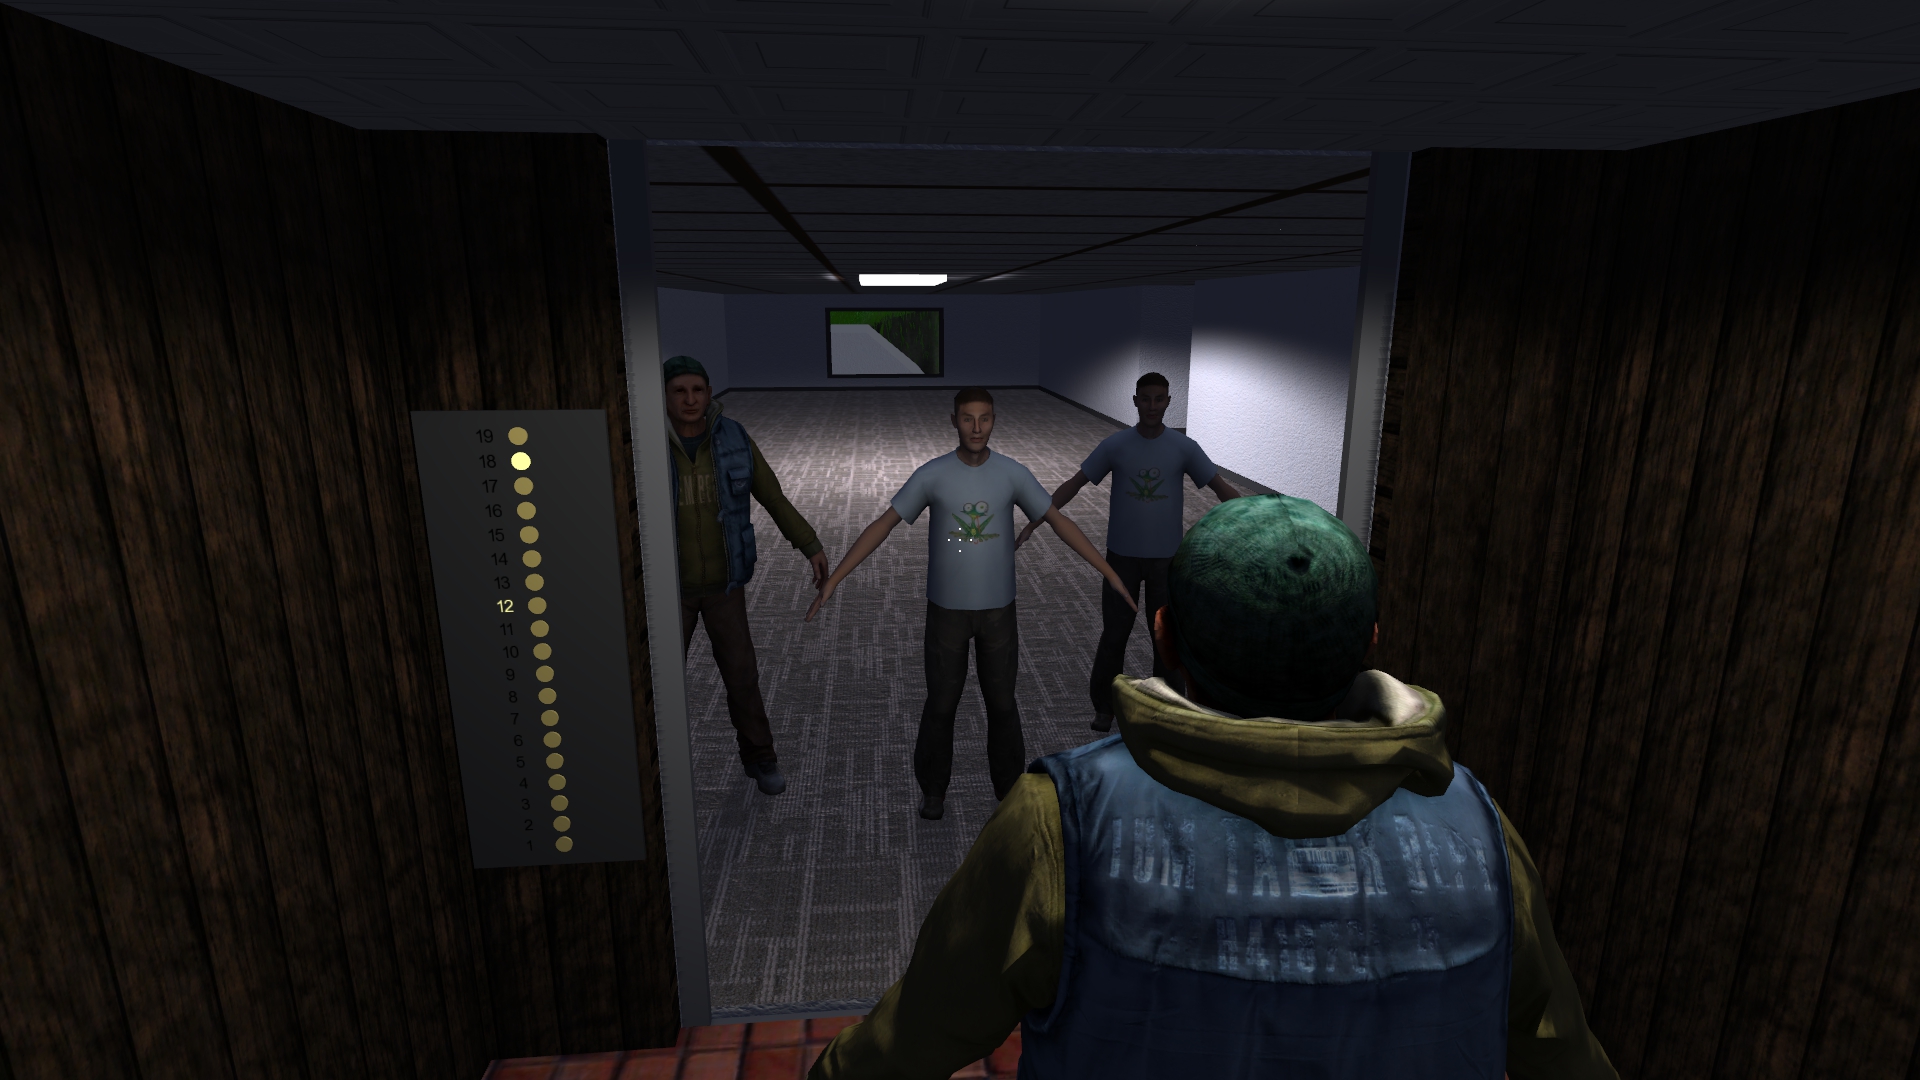
Here's another video where I have 20 different person AIs attempting to use a single
elevator in a 19 story office building. The elevator capacity
has been set to 1 to keep people from intersecting each other when
inside the elevator. However, they may still cross through each other
when entering and exiting the elevator, as is seen in the beginning of the video. It's either this, or one person pushing the other, possibly into the elevator with them. I have a config file option/variable to select between these two behaviors. Currently people give up waiting
for the elevator after 60s, which is why the elevator sometimes stops
on a floor with no one waiting on it. Also, at the end I can't properly
click on the elevator button with the Windows gaming overlay recording enabled
for some reason.
In case anyone is curious about the clicking sounds, that's the automatic office room lights switching on when motion is detected and switching off again after 30s. I should limit the sounds to only play when the player is on the same floor of the building as the light. ... Done.
I put some more thought and experimentation into the problem of people passing through each other when entering and exiting the elevator. My first attempt was to check if someone else was waiting in front of the elevator where the person exiting the elevator was intending to walk. If so, the tangent to the collision point is calculated and the destination is adjusted in this direction. That works in some cases, but in others causes the person exiting the elevator to circle around and eventually merge with the person waiting to get in! I'm not sure what the problem is, but I would rather try a different approach than debug that one. Next, I tried to have the exiting AI stop and turn when they collided with someone who was waiting. This sometimes resulted in the AI blocking the way of the other person and getting pushed back into the elevator when that person entered. Neither of these solutions would work in the case where the front of the elevator was blocked by a group of people like in the screenshot below.
You Shall Not Pass!
In this case, we need to have the waiting people move out of the way first. But we can't simply have the "primary blocker" (person in the center) move to the side, because other people are already there. So ... it has to be some complex chain of movement? Sigh. I'll continue to think about this later.
Okay, later has come and gone. I *think* I have it working for the case when there are only two people. The person in the elevator walks forward until they're clear of the elevator, then chooses a point to the nearest side of the person standing at the center, if there is one. Since we're not turning until we're outside of the elevator, this should prevent us from clipping through the doors when exiting or getting pushed back inside (as the exterior walls act as colliders). There should always be enough space between the person waiting and the elevator doors that we can walk around them, assuming the line forms behind or to the side of the first person rather than in front of them. That should probably hold true. This solution appears to work well when one person is waiting either at the center or to the side. Unfortunately, when there are two people standing side-by-side like in the screenshot above, the AI exiting the elevator will usually walk through one of the side people. I suppose that's good enough for now.
New Elevator Display
One final change I made was adding a floor number and direction display on each floor, outside the elevator by the door and above the call buttons. This will show the current floor the elevator is on and arrows indicating which direction it's moving when not stopped. Since I already had text drawing support, I made the arrows out of 90 degree rotated "<" and ">" angle bracket characters. Maybe it would have been better to reuse the turn arrow textures from city streetlights? I don't know, at least it fits with the drawing style of the numbers.
Here is a screenshot of an elevator interior control panel, in case you didn't catch it in one of the videos.
Interior of elevator with 19 floors.
And a screenshot of the elevator exterior showing the two call buttons, floor display, and up/down indicators. Sorry the screenshot is somewhat dark. This particular office doesn't have a ceiling light in front of the elevator.
Exterior of elevator viewed from floor 12 with it currently on floor 13 and going up.
That's it for this post. I'm not sure what the next step is. I might attempt to add support for multiple people in the elevator (capacity > 1), or possibly find a better solution for people crossing through each other when a pair is entering and exiting the elevator.
Months ago, I added basements to 3D World’s procedural buildings, including both houses and office buildings. I quite liked the darker underground rooms. They gave zombie gameplay mode a scarier feel, and the lack of windows made it more difficult for the player to navigate this area. Now I've taken it one step further by adding "extended basements" to houses, which are a series of underground rooms connected by mazes of hallways. I like to call this the dungeon.
The first version consisted of a tree of branching hallways, where each hallway had up to four other hallways connected to it at right angles with doors. Then I assigned the dead end (leaf) rooms as other types such as storage rooms, bathrooms, card rooms, etc. Since it can be pretty disorienting to walk around here, I enabled the placement of rugs and pictures on the walls to make the hallways more recognizable. Each room also has a row of lights spaced out along the ceiling that the player can turn on and off.
Each room is placed with a variety of constraints to keep it from intersecting other objects. One constraint is that the entire ceiling area must be under the surface of the mesh. I was initially worried about tree roots poking into the occasional room, so to handle that I simply don't draw trees (or any vegetation) when the player is in the basement. Next, I had to make sure none of the rooms intersected other rooms or the house's basement. Finally, I had to check for intersections with other buildings, including their extended basements. It's okay for these extended basement mazes of nearby buildings to wrap around each other. They sometimes do just that.
Now this is more tricky than it would seem because building generation is multi-threaded and in theory two threads can be attempting to add basements to adjacent buildings at the same time. Of course the probability of that is likely very small, given that there are 16,000 total buildings to be processed in a random order. My partial fix for this is to block off the area around a building until all of its rooms are placed, which should at least avoid intersections with the main building and basement. However, it may not matter anyway, since only the building the player is currently in is drawn when they're in a basement. In theory there could be two basements on top of each other and the player will never know - though I guess I won't know for sure what happens until I come across that situation.
But how do we determine which building the player is actually in when their location is inside two overlapping rooms from different buildings? My fix for this is to keep track of the building the player is currently in, and only allow it to be updated if the player leaves the building. This way it's not possible to move from one building to another in two consecutive frames without being outside all buildings for a frame in between. While that works well, it may interfere with my future plans of connecting the basements between multiple buildings as a way for the player to move between buildings underground. That's an area for future work.
This looked good, but it was too difficult to get cornered by a zombie at a dead end. I decided to add loops to make it more like a maze and less like a tree. Any placed hallway that happens to fully intersect or cross a previously placed room will now connect to it with a door. This means that some of non-hallway leaf rooms are no longer dead ends, which increases the variety of these floorplans.
But that wasn't enough. What's better than a dungeon-like maze of underground hallways and rooms? How about a multi-level maze! So I went about adding stairs and multiple floors, and after a long time spent debugging failed basements I was able to get it to work. I have the number of floors limited to 3 in the config file to keep the extended basements sane, though there's no hard limit other than that the lowest floor needs to be above sea level. Lower levels are added by inserting stairs at the end of a hallway and ending the stairs at the entrance to a new hallway one level below. Lower levels are allowed to cross under upper levels and reconnect with hallways and stairs that lead back up. Some stairs have railings to add variety.
Here are some screenshots of extended basements shown from above, to give a better idea of their overall layout. I've disabled the terrain and grass so that they're visible. All surfaces have back face culling enabled, which is why the ceilings aren't visible. Keep in mind that rooms weren't intended to be viewed through the terrain like this, so the lighting is all wrong (among other problems).
Building extended basement viewed from above, with terrain, grass, and ceilings hidden. 2 levels.
Another extended basement viewed from above, with terrain, grass, and ceilings hidden. 3 levels.
Huge underground basement complex on multiple levels that runs underneath other buildings.
Generating and drawing these added rooms wasn't too bad, but that's only
a fraction of the work. I had to make room lighting, shadows, and
indirect lighting work. Ray casting and collision detection were more difficult when there are no exterior walls to bound these rooms. I had to make the AIs for building people
understand how to navigate down here, follow the player, and cross
between the house and its extended basement. Note that the structure
down here is very different from the packed rectangular areas of the
above ground parts of the buildings. There's empty space (or I would
assume dirt) between these rooms, and that's a great place for the AI to
get stuck. Finally, I had to make rats, snakes, and spiders properly
handle these areas. This means I actually have to make these rooms work
with 4 different AI systems! Overall I was able to share most of the code, but I did have to add quite a few special cases to the code.
Here are some screenshots of extended basements shown in the intended way where the player is inside the rooms rather than looking down with X-ray vision. You can't see too much at any given time due to the narrow hallways and right angle turns.
Extended basement with three levels (two sets of stairs) along the same hallway.
Extended basement hallways and rooms with a person, a rat on the floor, and railings for the stairs.
Even extended basements contain bathrooms, with mirror reflections.
I'm sure there are many future extensions of this system. As mentioned above, I would like to consider connecting the basements of adjacent houses that happen to be at the same elevation. It may also be interesting to add more basement and parking garage areas to office buildings in a similar way. I made some of the basement lights flicker, but I'm sure there are other interesting effects that I can add to increase the spooky atmosphere of basements.
So far I've added people, rats, and spiders to buildings. They can all be considered a sort of enemy of the player in gameplay mode. What other hostile animals can I add? How about poisonous snakes that attack the player when they get close.
Snakes are similar to rats because they stay on the floor and can't climb walls and other objects like spiders. Snakes are limited to the ground floor and currently can't be picked up by the player. They're more aggressive than rats, and will bite the player when in range rather than running and hiding under furniture. However, they completely ignore the player when the player isn't right next to them. This makes them easier to avoid, assuming you're paying attention to your surroundings and being careful when entering new rooms.
There are currently two types of snakes, those with rattles and those without. All snakes can damage the player by biting, but only rattlesnakes are
poisonous and will do damage over time. This uses the same mechanic as
spider bites. The only item that can cure the player of poison is the medicine bottle, which can be found in house medicine cabinets and on rare occasions in drawers. I modified the player inventory to allow medicine bottles to be collected and consumed later if not immediately needed, which make it a bit easier to survive snake and spider venom.
I used a similar approach to spiders when drawing snakes, forming them procedurally in code from transformed cylinders, cones, and spheres. They consist of 18 connected segments, representing individual ribs, with a head at one end and either a tail or a rattle at the other. I found two different textures to use for their scales, and added a random color variation from light brown to nearly black. Each snake has two eyes on the sides of its head and a forked tongue that will occasionally come out.
Four snakes on the kitchen floor. One is a rattlesnake. The center snake has its pink tongue out.
Snakes have a unique movement and animation system. Each segment moves individually in a smooth motion that follows the path of the segment in front. The head moves in a sine wave pattern to give the body movement a wavy, flowing path that I based on the movement of my pet snake Audrey and other images and videos of snakes I found online. Snakes can also curve or straighten their bodies to fit through narrow openings and avoid collisions.
Collision avoidance was by far the most difficult feature to implement. Snakes must avoid the following objects, ordered from highest to lowest priority:
The edges of the building bounding cube (otherwise bad things happen such as the code crashing or the snakes disappearing)
Exterior building walls (outside the building they're not drawn correctly)
Interior building walls
Open and closed doors
Stairs and elevators
Static room objects (furniture, appliances, etc.); fortunately I was able to reuse all of the rat collision logic for these.
Other snakes, rats, and spiders
Themselves; it's important to avoid self intersections; this one was quite challenging
I already had code for most of the items near the top of the list. The only real difference between snakes and rats related to static object collisions is that representing snakes as a bounding sphere is too inaccurate. For the purpose of detecting collisions for the snake itself, I only need to consider a bounding sphere around its head. The rest of the body will follow the path of the head and will also avoid the same static objects. However, checking for collisions with other snakes and the snake itself requires finding intersections with each cylindrical body segment.
It took quite some time to get all of this working. When a collision is detected, a new head direction is randomly chosen within the 180 degrees around the collision normal. Directions closer to the initial head orientation are given a higher weight so that snakes are more likely to continue along a similar path rather than reversing direction and doubling back on themselves. The most common modes of failure for collision detection resulted in the snake getting stuck with its head slightly inside a wall or other object (including its own body).
I was able to fix all but one case of the snake getting stuck with reasonable effort. The final case was where a snake was forced into a curve while colliding with another snake, and it spiraled into itself to the point where its head was completely surrounded by its body and it couldn't move. After several failed attempts, I finally fixed this by setting the collision normal to be the direction of the colliding segment coming from its head. This would force the head to turn toward the direction of the tail on collisions, rather than curving toward itself.
I also found and fixed a pretty funny bug. When the snake was stuck against an object such as the player, it would choose random new direction each frame. This would cause the head orientation to jiggle around randomly. In addition, this triggered the animation system to update, which resulted in the snake's eyes spinning around its head!
Here's a YouTube video showing a number of snakes in the living room of a house. They glide around on the floor and attempt to avoid objects, each other, and themselves. I find it quite interesting how they can weave between the table and chair legs using collision avoidance forces. Note that I already fixed the rat vs. snake collision bug. I was incorrectly using the snake's bounding sphere radius rather than the snake's body radius to move the rat to a non-colliding position.
It's time to discuss indirect room lighting. This is turning out to be a long and technical post. I've scattered some screenshots around in there somewhere for those of you who don't want to read the wall of text. I'll also add Wikipedia links for some of the technical terms.
I want to improve the quality of lighting inside my procedural buildings. Most of my previous screenshots have shown the combined contributions of three types of lighting:
Direct lighting from room ceiling lights and lamps, pointed downward in the lower hemisphere as a 180 degree spotlight so that I can use a single shadow map
A very weak sky lighting representing light coming in through windows, which at least tints walls different colors in otherwise unlit rooms
A fake constant ambient term that varies by floor/basement/attic
This looks reasonably good in well lit rooms where the lights are on. However, rooms with their lights off have very flat colors and all surfaces tend to look the same. This is both uninteresting and unrealistic. Also, places in shadows and along the upper wall and ceiling of lit rooms have very little indirect light and suffer from the same problems.
I've been trying to add proper indirect lighting support for some time now. Has it been as much as a year? Maybe. The difficulty is getting a good quality of lighting with low noise and low light leakage through walls, and having this lighting update in buildings as the player moves around without causing lag and hurting the framerate.
I consider this a solved problem for fixed size static scenes in 3DWorld. I can precompute lighting offline, save it to disk, and reload it in under a second when the scene is loaded in 3DWorld. This works well on scenes of moderate complexity such as San Miguel. I even had this working for my office building basement using player controlled dynamic lights, and in the static Sponza scene all the way back in 2014. This system worked by sending millions of rays from the sun, sky, and local point lights into the scene, calculating their reflections/refractions, and accumulating their paths into a 3D volume texture.
Why can't I use the same solution here? Well, in theory I can. The only problem is that the player has to wait 20 min. for the lighting to be computed before entering a building. [Technically we can also let the player enter the building and wait 20 min. for lighting to appear.] That doesn't work very well in an open world game with thousands of buildings, does it? Now I can hack things and use a few tens of thousands of rays rather than millions to get the computation down to a few seconds. My first attempt at this gave me the following results:
Failed attempt at indirect lighting on building interiors. Did I show this screenshot in a previous post?
That's actually a really neat effect. It looks like the walls are made of dirty aluminum foil due to the way their normal maps interact with the lighting. That's not the look I was going for here, but I can't pass up the opportunity to show off my accidental artwork. I was able to fix this of course, but the floor didn't get much better than that black and gray pixelated mess you see above. So I could get noisy garbage lighting in a few seconds, or wait tens of minutes to get something that looked nice. Neither case was acceptable, so I lost interest in this last year.
... Wait, that screenshot is from Feb. 2020. So this was over two years ago? Wow, I didn't realize it had been that long. Surely I've gotten a new computer since then, it's super fast, and that solved all of my problems, right? Nope, same computer. It's too much effort to install all of my software and development tools on a new PC.
Optimizations
Anyway, I got back to working on this a few months ago. There are actually quite a few optimizations I can use to speed this up and get more rays (= less noise) in less runtime. I can also reserve one of my CPU cores for drawing the scene rather than using them all for lighting computation, which allows me to get a reasonable framerate for walking around in the building while the lighting is being computed in the background.
I'm storing precomputed lighting values in 3D voxels
(volume elements). Each fragment (pixel in non-OpenGL terms) of drawn
geometry queries its indirect lighting from the nearest voxel, biased in
the direction of the surface normal. One of the reasons why tracing light rays is slow is because I need to accumulate light into all voxels along the entire path of the ray rather than only at the hit points. This nearly doubles runtime, especially for long rays in open space when using a fine voxel grid. I need to store lighting data for the empty space in a room to get proper lighting on dynamic objects such as people, animals, and whatever items the player moves around. These objects aren't present during lighting computation, so there are no ray hit points associated with them.
One of the biggest optimizations I discovered is to only calculate lighting on the floor of the building the player is on. It seems so obvious now that I think about it. This cuts the number of active light sources by a factor of 10x for a 10 story building, which is quite good. But it gets better than that! I can build the 3D acceleration structure I use for ray intersection checks for only objects on the current floor rather than the entire building. I don't get another 10x runtime reduction though, because ray query time scales as the log of the number of objects in the bounding volume hierarchy. The actual speedup is more like 20x for a 10 story building. That's still pretty good though. The cost I pay for this decision is incorrect lighting on floors above and below the player when looking up or down stairs.
Another related optimization is that I only need to store the lighting for a few floors of one building at a time, and I only need to draw it for the floor the player is on. This reduces memory usage on both the CPU and the GPU. I pass the 3D bounding cube of the current floor into the fragment shader and use my original constant ambient term rather than the indirect lighting calculation for anything drawn outside the current floor. This way the slice of valid indirect lighting can follow the player around and everything else looks as it did with indirect lighting disabled. I was even able to go back and further optimize ray intersections to simply clamp rays to the range of z-values (altitudes) spanned by the current floor since any rays extending outside the range are ignored anyway.
I chose a range of 5 floors to store in memory. This allows the player to walk between the floors of houses without invalidating lighting data along the way, since all floors can fit within this range. If I had used only one floor, the lighting would need to be rebuilt every time the player walked up or down the stairs. Note that some houses with both basements and tall attics can exceed this range and require some amount of re-computation. Office buildings can be as high as 20 floors and won't all fit in memory at once. I decided to disable lighting updates while the player is in an elevator so that lighting is not unnecessarily computed for floors the player doesn't even stop on. Lighting updates will begin when the elevator door opens, where the first light to be updated is likely the one on the ceiling in front of the elevator.
The next step was to prioritize lights that have more of an effect on the area visible to the player. This includes weighting based on lights near the player and in the view frustum, and lights inside/affecting the room the player is in. This change allowed me to generate lighting almost immediately for nearby rooms, have the lighting follow the player around as they moved from room to room, and compute lighting for rooms not yet visible in the background when the player stops.
Noise
Those optimizations, plus some smaller ones that I won't list, allowed me to have near realtime indirect lighting. It works well for rooms that are fairly well lit. Unfortunately, it still has a lot of noise in rooms that are less well lit due to the relatively small number of rays reaching these rooms from light sources on the ceilings of other rooms. These rays take several bounces to get there. The fewer ray samples there are, the higher the variance, and this leads to random noise. Here's one example:
Indirect lighting in a room with the light off. All light comes from other rooms, most of it indirect. Lighting is noisy in cases like this.
It's noisy, but it's fast. Getting results of this quality before these optimizations involved suffering through a minute of low, laggy framerate before any indirect lighting appeared. If I increase the number of light rays by 10x I can almost completely remove the noise, but the player must wait for the lighting to appear again. It's a typical runtime vs. quality trade-off. I would call this partial success.
Indirect lighting in a kitchen with the lights off again. The area under the chairs is dark.
It's unclear if this solution is worthwhile in these situations, but it appears to work great in basements, parking garages, and attics. There are fewer objects and no windows, so it tends to be faster. Basement lighting is normally uniformly dark, so having indirect lighting is a huge improvement even if it's noisy. The same is true for attics. I added config options to only enable indirect lighting in basements and/or attics where it's faster and more effective. I may make this the default going forward.
Light Leakage
I ran into another problem: light leakage. Indirect lighting is stored in a 3D grid of equal size voxels. If a voxel is wider than a wall, the floor and ceiling on each side of the wall often query the same voxel. This may result in light areas around the edge of a wall in a dark room where the adjacent room has a bright light. Similarly, there may be dark edges around a wall of a lit room next to a dark room. I can't make walls thicker without breaking other parts of building generation, and I can't make the voxels too small due to computation time and memory constraints. Fortunately, my optimization to limit indirect lighting to the current few floors avoids this same problem in the vertical direction involving the ceilings and floors.
If you look closely at some of the screenshots in this post, you can see bands of bright or dark areas around the edges of walls, ceilings, and floors. There are similar dark edges around the curved sides of ceiling light fixtures that are turned off. It's not too bad after I made a pass at tweaking constants in the code.
Indirect lighting in a basement room. There's less noise when the light is on. You can see a red tint on the ceiling from light that bounces on the red rug on the floor. The man standing in the room has indirect lighting as well.
Here's another basement where the noise is almost undetectable. It helps to have lit rooms with dark ceilings. Also, I added a screenshot of a parking garage with cars.
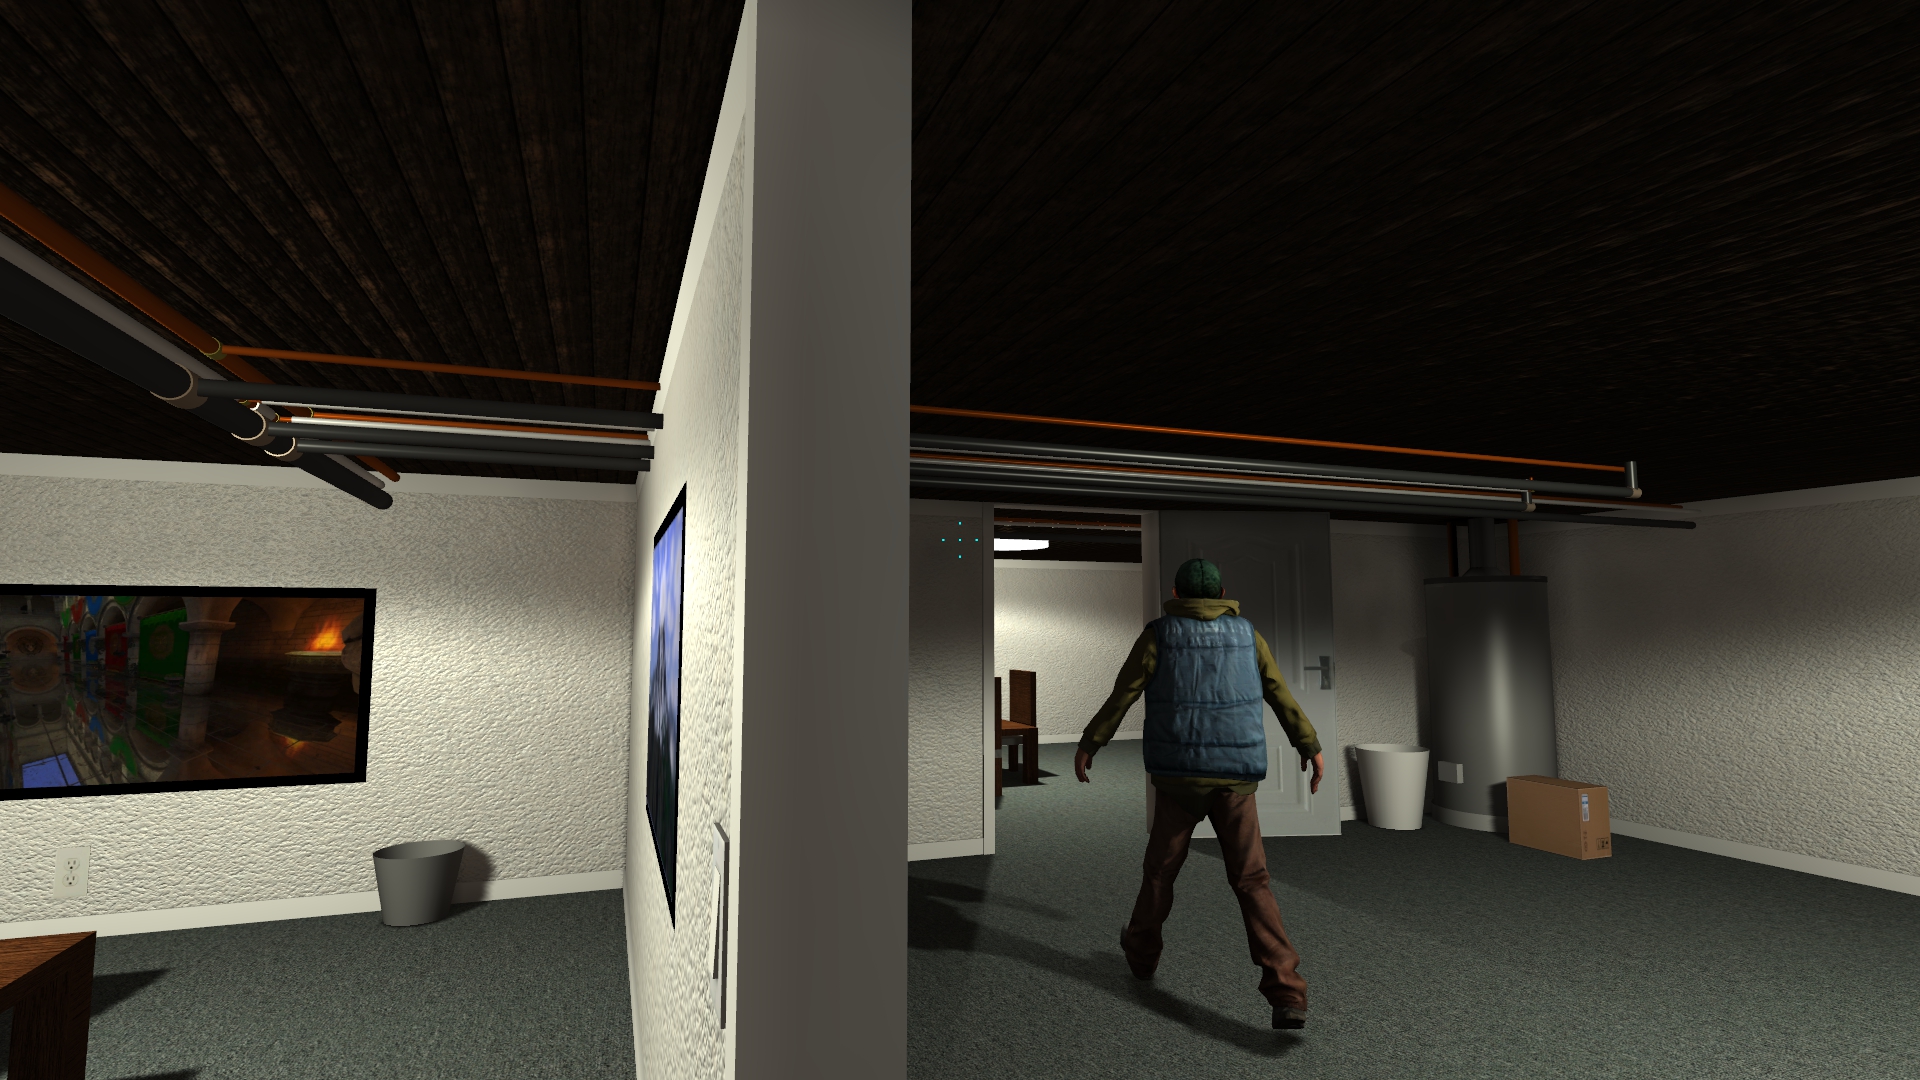
Indirect lighting in the basement makes it easier to see the pipes near the ceiling. Without it they're in shadow and appear very dark. You can also see some darkening above the water heater.
Parking garage with indirect lighting. The indirect component makes the pipes and ceiling easier to see, and softens the shadows under the cars.
Windows
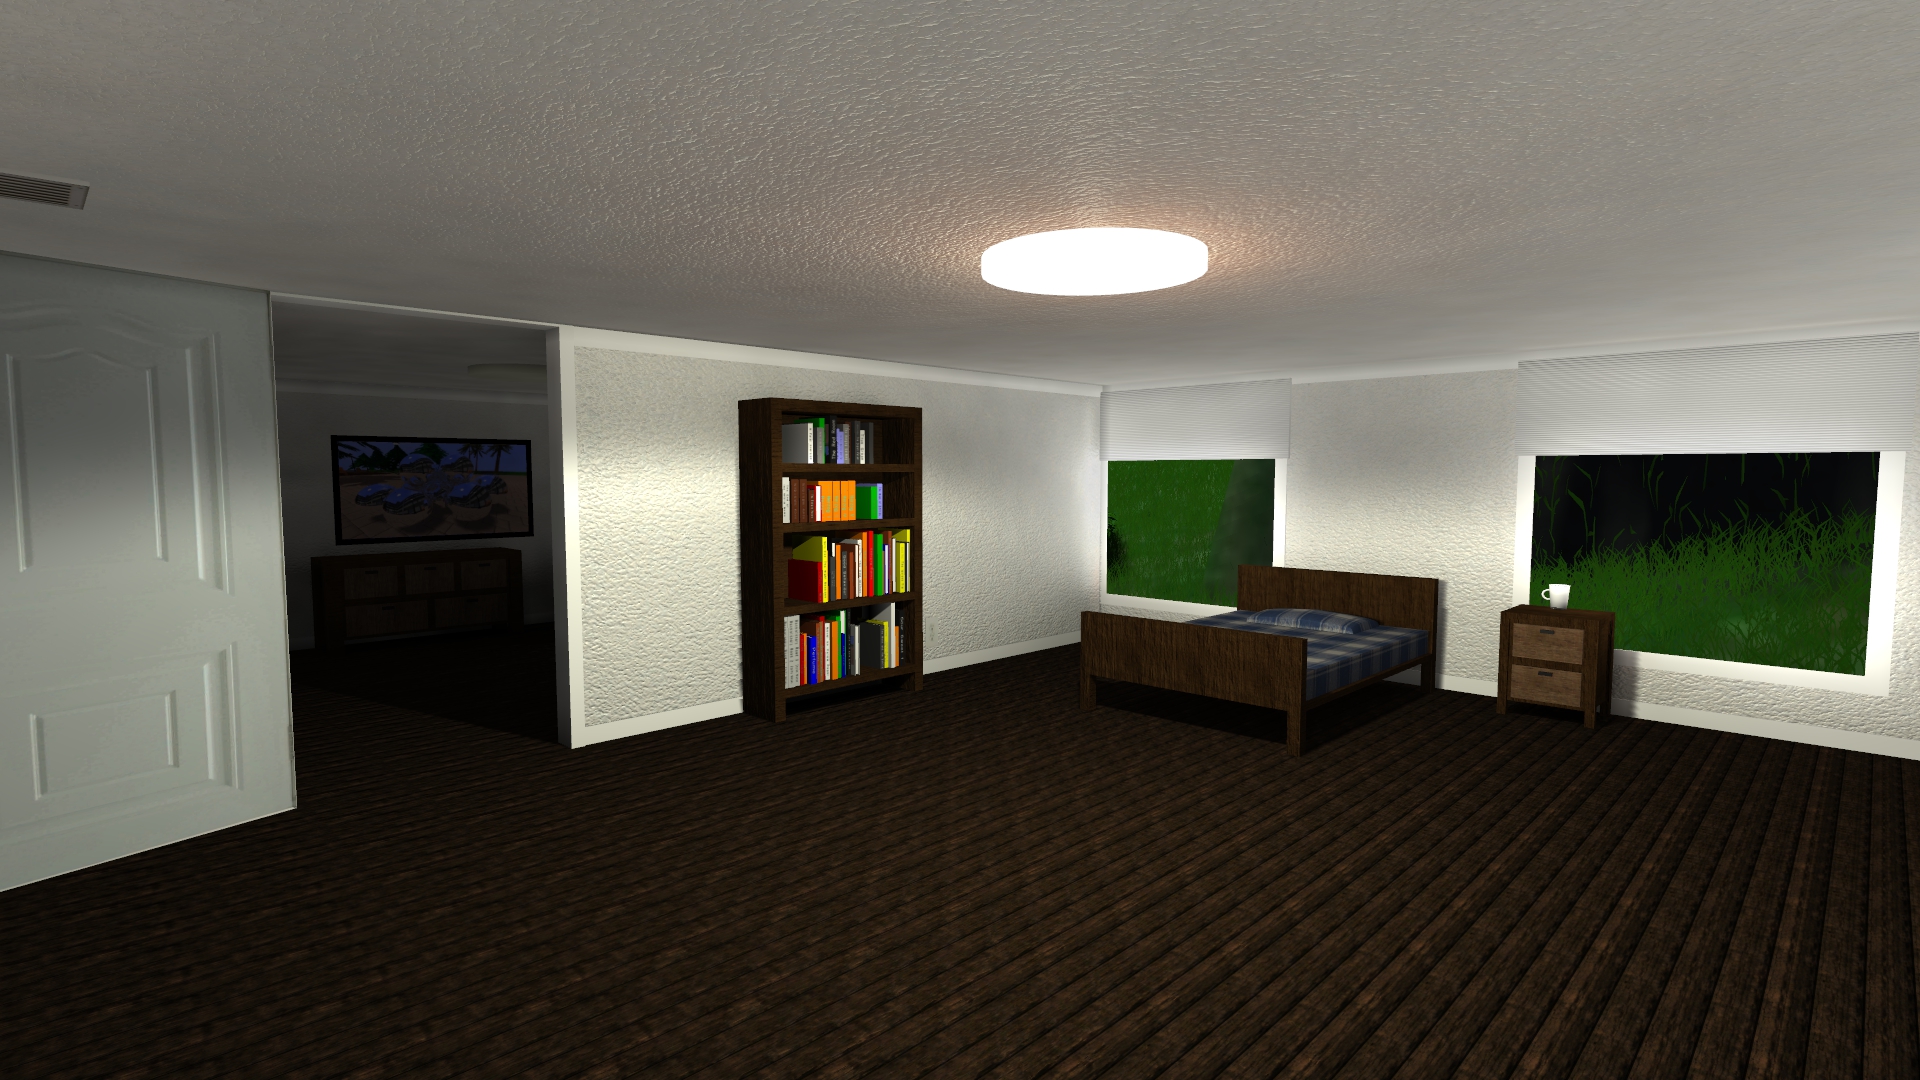
So far I only discussed indirect lighting from room ceiling lights and lamps. There's another source of indirect lighting. Can you think of it? I'll give you a hint: Bedrooms shouldn't be dark like basements when the light is off during the daytime. That's right, I need to include the indirect lighting from the sun (and moon) coming in through the windows. I can treat each window as an area light source and generate rays through it that enter the building. This works well, but sadly now there are more than twice as many light sources to handle in a typical house. On top of that, windows seem to need more rays to reduce their noise, so we're back to having a slow lighting solution. Fortunately, it's still much faster than it was before.
Bedroom with the ceiling light off. All light comes in from the windows. You can see the soft shadows under the bed and dresser.
Bedroom brightly lit from both the ceiling light and the sun outside.
Here's a comparison of the same room with and without indirect lighting. The second image has brighter walls with more color variation and fewer shadows.
Bedroom with direct lighting from the ceiling light (pointed down) and a constant ambient term.
Bedroom with both direct and indirect lighting from the ceiling light, and indirect lighting through the windows.
I'm not quite sure why there's an orange tint around the light on the ceiling. Maybe it's because the color of the light is somewhat orange-ish rather than completely white. It could be that the color is saturated to white in some areas but not around that cylinder. Or maybe there's an orange rug above it in the attic and I'm getting some sort of incorrect light bleeding from that. I have no idea. I should go back and revisit this, if I can manage to find that house again. (It's not one of the houses next to the player's starting position.)
[Update: I found the house again. It looks like the light itself is yellow. It appears white because the direct + indirect/ambient saturates the colors to white, possibly because the gamma correction is off. The light shines downward with a 180 degree field of view in the bottom hemisphere. Therefore it doesn't shine directly on the ceiling. The lighting near the light in the center of the ceiling is yellow light reflected off a dark brown floor, plus the edges of the light fixture itself, which I guess results in that shade of orange.]
Dynamic Lighting / Player Interaction
So we're done, problem solved, right? Not quite. Up until now I've treated buildings as static. In reality the player can turn lights on and off, open and close doors, and move furniture around. All of these things will obviously affect the indirect lighting. As you might expect, adding support for dynamic indirect lighting introduces a huge amount of complexity. I haven't quite figured everything out yet.
Let me start with turning room lights, closet lights, and lamps on and off. It can either be the action of the player, the building AI people, or one of the new motion detection + timer lights. (I added that last one to automatically turn lights on and off in some office buildings.) This also includes the player opening and closing bedroom window blinds, which I have somewhat working. The full precomputed lighting on a building floor is the sum of the indirect lighting from each light source. This means that turning a light on is as simple as adding a new light to our queue of lights to process that will be accumulated into the total. Turning lights off is more complex. It can be implemented by subtracting light by using a negative intensity ray, but we need to be careful to make the rays deterministic so that the positive and negative rays will exactly cancel each other out. A lack of determinism leads to - you guessed it - more noise. Finding a deterministic solution that worked across multiple threads proved to be difficult.
One possible optimization is to cache the contribution of each
light source separately. This avoids re-computation when the player turns lights on
and off, and also solves the determinism problem. The downside is that
this is both complex and takes significant memory. The light volume
itself consists of 128x128x128 = 2M voxels in {X, Y, Z}. Each voxel
holds a floating-point number for each of the {red, green, blue,
intensity} components of light. 2M * 4 bytes * 4 components = 32MB of
data. A single building floor can contain as many as 100 lights, including ceiling lights, closet lights, lamps, and windows. We clearly
can't be storing 3.2GB of cached data across all lights. How can this be
improved? Most lights will only affect a few rooms on a single floor
rather than the entire 5-story horizontal slice of a building. If I was to compute
the bounding cube of influence of each light, it would be constrained to a small subset by the walls, the floor below, and the ceiling above. This would reduce memory
usage to as low as 1MB per light. That would still be 100MB of data for
100 lights, but this number is reasonable.
I was pretty happy with the system I had in place for recomputing indirect lighting when room lights were toggled by the player. I considered doors next. Opening and closing doors is more complex because they can influence multiple lights that illuminate the room on each side of the door. When a door is closed, light rays that previously reflected off the door back into room will instead exit that room and add light to the adjacent room. This requires the indirect accumulation to shift between the two rooms, and possibly other nearby rooms connected with open doors.
It was easy enough to determine which lights are affected by which doors by using the room connectivity graph. The hard part was figuring out how to correctly rebuild the ray spatial acceleration structure when a door opens or closes. The problem is, indirect lighting ray tracing is running in another thread in the background. I can't simply rebuild the data structure while it's being used. Instead, I have to wait for the current light's computation to finish, or kill it if the current light will be invalidated by the door state change. Then I have to remove the contribution of each light that will be updated, using the door's original state. Next, I can update the door's state and rebuild the acceleration structure. Finally, I have to re-add each light's contribution using the door's new state.
This sort of works, in theory. In practice it's problematic because I need to update the door's open/closed state in the drawing code immediately, otherwise it will look odd if the door doesn't move until the lighting is completed a few seconds later. So I have to use two different door states: first the drawing state changes, then the lighting state changes once old lights have been removed. To make matters worse, what happens if the player toggles the door back to it's original state before the lighting has been updated? Or what if the player opens or closes some other door that affects the same light(s)? I can build a queue of door state changes and light update passes, but the system may not be able to keep up with the player. Even if it can keep up, it's probably going to be wasting a ton of CPU cycles recomputing everything.
I experimented with this for quite some time, but was never able to get it working correctly in all cases. Instead I left it as-is, where it only works correctly when the player opens or closes a door when there's no current lighting calculation and no pending light updates. Otherwise the lighting is wrong in various ways. Then I later disabled door updates entirely because the failure cases where light or darkness appeared from nowhere caused too many issues. Door state changes now only have an effect if they happen when lights are off, because the new door state will be picked up and used when lighting is recomputed as lights are turned on.
Doors are trouble for other reasons. Remember the potential light caching optimization I mentioned a few paragraphs above? Well, any door open or close events will have to invalidate cached lights whose area of influence cubes intersect the door. (In fact, any player movement of furniture should affect lighting as well, but I'm going to ignore that for this discussion.) It's only worthwhile to cache lights if they remain valid for multiple on/off toggles without a door state changing in between. So, which happens more frequently, a light toggle or a door open/close? I'm not sure. Given the fact that door state changes affect multiple lights, my guess is that light invalidations are more frequent than light switch toggles, meaning there's not much benefit in caching per-light data. This is why I haven't yet implemented light caching. The cost of high memory usage, code complexity, and frequent invalidations combined to likely outweigh the benefits.
Indirect lighting is still a work in progress. I have it disabled by default and can toggle it with a key press. I'll probably enable it for basements and attics where it works best, and for screenshots. If I can find more ways to either improve computation time or reduce noise then I may enable it by default later.
The technical reader may wonder why I don't simply use screen space ambient occlusion. I've considered this approach, and done some experiments, but I found that it doesn't work very well in this application. First, I'm using Forward+ (tiled forward) lighting and don't have normals available in the fragment shader. This makes SSAO more difficult to implement. Also, there are lots of partially transparent materials (windows, glass tables, car windshields), alpha masked leaves and grass, ray marched clouds, and various other drawn objects that are unfriendly to SSAO. Besides, it's not a physically correct approach and it doesn't add neat effects such as color transfer between surfaces.
This is a follow-up post to my previous one on house attics. After I had written the initial code to populate attics with random items, I decided that I was missing air ducts. I already had furnaces in some attics, and I already wrote a system for placing a network of pipes. Surely it won't be too difficult to add ducts next, right?
I started by adding vents to the ceilings of most of the rooms in houses using code modified from what I wrote to add vents to the walls of office buildings. It's actually easier because I only have to avoid ceiling lights, stairwells, and attic doors, which are the only objects currently placed on ceilings. This means it's almost always possible to place a valid ceiling vent. For now I'm only attempting to connect vents on the topmost floor (below the attic) with ducts, and only when there's a furnace in the attic. The ground floor could probably have vents in the floors instead and air ducts in the basement or crawlspace. I'm not sure how to handle middle floors since I haven't lived in a house like this that I could use as a reference. I suppose the ducts are in the walls or between the ceilings and floors in that case. Sadly, my walls and ceiling-floor gaps are currently too narrow to fit ducts. For now I left these vents unconnected.
I added an extra duct on top of the furnace for the air return, and routed that down around the back to a larger intake vent on the ceiling under the furnace. Sometimes the furnace is too close to the attic roof and it won't fit. In this situation I omit the air return in the hope that the player doesn't notice. The intake vent wasn't always landing in a convenient location, so I changed the furnace placement to position it above a hallway or larger room with stairs and not above the ceiling light. This worked well because the furnace has no other placement constraints and can be put almost anywhere, as long as it's not too close to the edge of the attic and not blocking the attic access door.
I started with ducts that have rectangular cross sections as that seemed like it would be easier. Each section of duct is divided into an integer number of metal cubes with one tile of a texture applied to each face. This gives it the look of a modular air system. Here's an example attic.
Attic with wood panels and furnace next to open attic access door. This one has many air ducts but not many other objects.
It took me many attempts at placing ducts correctly and realistically. I settled on sorting vents from furthest to closest to the furnace to form the main routes first. Vents that happened to line up with the furnace were connected with straight segments. Otherwise, they were connected with an L-shaped connection consisting of a segment in X and a segment in Y that met at a right angle. There are two such possible segments, one starting in X and the other starting in Y. I chose a random one of these and selected the other orientation when the first one was invalid. Since attics are always rectangular, I don't have to worry about their routing going outside the attic. Therefore, the only constraint is that they don't intersect the wood vertical roof support pillars and don't block the attic access door/stairs. If the path of the duct intersects a previously placed duct, it's shortened and connected to that duct with a straight or T-joint. Then I also generate a straight segment to the nearest existing duct and use that instead if it's valid and the distance is less than the length of the original path to the furnace. Any vent that happens to intersect a previous duct when extended upward into the attic is directly joined to it.
That set of rules was able to successfully route about 90% of vents to the furnace. The remaining failures were cases where the vent was on the opposite side of the attic access door from the furnace and a single jog wouldn't work. I made many attempts to solve this. What I ended up doing was splitting up ducts that had been placed earlier into short segments and attempting to route the unconnected vent to the center of the closest segment with a pair of straight runs with a single jog. This is the same logic used to connect vents to the furnace. If the closest segment can't be connected to, then we look at the next closest segment, until the vent is connected or no segments are left. In theory this can still fail, in particular if all of the vents are across the attic access door from the furnace. However, I haven't been able to find a case like this after visiting dozens of attics. So I consider it solved. In the rare event I miss a vent it's not obvious anyway, unless the player clips through the floor to see that the vent is unconnected.
Boxes and other attic objects are placed after the ducts so that there are no intersections. I had to increase the number of objects in attics with furnaces and ducts to offset the loss of floor space for placing them.
I've also added different floor and ceiling surfaces for attics. Maybe that's a bit off topic for this post, but I may as well mention it since it's obvious from my screenshots. Floors can now be either wood planks or plywood. Ceilings can be wood planks, plywood, fiberglass insulation, or finished plaster. Here's an example of a cluttered attic with ducts and plywood on both the ceiling and floor.
Cluttered attic with plywood, furnace, and air ducts. Yes, the furnace is missing the air return duct on top because it's too close to the wall.
Here's another attic with that pink fluffy fiberglass insulation in the roof between the rafters. I couldn't find a seamless texture for fiberglass insulation. I even tried looking for cotton candy textures, but came up empty handed on that as well. None of the free textures I could find were seamless/tileable. In the end I generated a cloud texture in Gimp and tinted it pink. I suppose it looks good enough.
Attic with pink fiberglass insulation, furnace, and air ducts. Sigh, no air return again.
You can see in this screenshot that the main duct is wider than the smaller ducts connecting to it. This is in fact the result of multiple ducts routing to the same side of the furnace being merged and the max width used for the connection. It often happens to work out this way. It's also pretty common to have ducts coming from each side of the furnace and extending toward different sides of the attic.
When I was finished with rectangular ducts, I moved on to cylindrical ducts. These turned out to be much more difficult to join together. I was able to place rectangular metal boxes over the ceiling vents to make it easier to connect the ducts, but joining ducts together caused a lot of trouble. For example, two ducts running next to each other can't simply be merged the same way as cubes to form a wider duct. Instead, they must be shifted around so that either their ends meet exactly or they form a T-junction. Texture alignment generated additional complexity.
This attic has cylindrical ducts. I like the look of the rectangular ducts better.
I suppose this looks acceptable. I would have liked to use wider ducts for main branches with many vents along them, but I ran into problems with player collision detection when using cylinders of larger radius. I want to keep them small enough so that the player can step over them to make the attic open for exploration. I prefer the look of rectangular ducts, so I made cylindrical ducts appear in only 25% of attics even though I feel they're more common in real houses (including mine).
That looks good for houses. Now what about office buildings? It makes sense that the furnace(s) should go in the same utility rooms as the water heater(s) I added a few months ago. I don't think office buildings generally use the same small furnaces as houses, but I can still add some as temporary placeholders until I figure out how to include commercial HVAC systems. It's easy to add them, so why not?
Office building utility room with water heaters, sink, and now furnaces.
Of course now I need to find a way to connect these to wall vents in offices. Until I do so, the player will have to imagine there are ducts somewhere in the thin walls. This particular utility room annoys me though because there's a wall vent right next to the furnace, yet it's not connected! At the very least I should go back and connect that one, or possibly relocate it to the side of one of the ducts above a furnace.
I'm pretty happy with the current state of furnaces, vents, and ducts. I might go back and add floor vents with basement ducts sometime later.
I was originally planning to work on indirect lighting for building interiors next. This turned out to be a very difficult and time consuming project, and I don't have too much to show for this yet because it's still incomplete. My next post will likely be on the topic of indirect lighting. Somewhere in the middle of that my development was interrupted by someone suggesting I add attics to houses. That's a great idea!
Problem Statement
Of course attics were also quite complex and time consuming to add. I would say about as much work as house basements or office building parking garages. This was primarily due to two reasons: First, attics aren't cube-shaped rooms, they have sloped roof polygons rather than vertical walls and horizontal/parallel ceilings. None of my existing code worked in this case, including object placement, wall decorations, lighting, player collision, and people/rat/spider AI updates. I basically had to special case all of this code to handle attics. Then I had to write custom sphere/ray/cube intersection code to handle roof polygons, which required many debug iterations.
Second, I wanted to add attics without modifying any of the existing interior or exterior geometry. I can't be going back and reworking every system each time I add a new building feature. This means that attics must connect to existing rooms without moving walls and light fixtures. They must handle things like chimneys crossing through them. They can't break the existing people, rat, or spider movement systems. And, by far the most difficult, they must work with multiple sections of roof intersecting at odd angles.
Adding attics introduced a lot of new complexity, but at least I didn't have to deal with windows and doors. I'm sure it's possible to go back and add skylights and ventilation to attics later if I'm up for the challenge.
Attic Roofs
This last case can come up in L-shaped houses that have both cube sections at the same height, such that the roofs of the two parts intersect each other. According to this diagram, these would be the "crossed gable" and "cross hipped" roof types. Up until now the player was not allowed inside the roof area, so all of the polygons clipping through each other weren't visible. But now that I want to make this part of the attic interior, this has to be dealt with somehow. At first I added special cases to skip adding attics to this type of house. Later I got back to working on this and wrote the code to clip roof polygons (triangles and convex quads) to the other existing roof polygons. It wasn't as bad as I thought, and worked pretty well. I still wasn't sure what to do with an L-shaped area and how exactly to add objects such as wood beams in the roof. In the end I added vertical walls to split the area into two separate cubes, and made the larger one the attic.
Now that I think of it, I can probably go back and simplify all of the rooftop solar panel placement logic. The existing system goes through a lot of trouble to detect if a roof polygon clips through another polygon to avoid placing a solar panel on it that intersects other geometry. Maybe this code is no longer needed since polygons no longer intersect? I may be able to simplify roof power line connection logic as well.
Another issue that came up was attics where the ceiling was too low for the player to stand. Depending on how I implemented the collision detection, either the player's head would stick out of the roof, or they couldn't enter the attic. Neither of these is acceptable. My initial thought was to skip adding an attic in this case, but this didn't work because attics were added before the roof. I didn't want to reorder the steps because this would break that "without modifying existing geometry" rule above. So instead I set a min roof height for the part containing the attic to ensure the player could stand inside it. This mostly worked, but generated comically tall and narrow roofs for some thin house sections. I had to go back and skip adding attics to house parts that were too narrow. I don't like this complex chain of logic that was needed, but I'm not sure how else it could have been done.
Small attic with two lights and an open door with a ladder extending down into a dark room below.
Attic Access Doors and Ladders
Attics are accessed by a door that pulls down from the ceiling with a folding wooden ladder. This is how the attic is accessed in most of the houses I've lived in. I placed the door in one of the larger rooms near the center of the house, in the ceiling of the topmost floor. If the house contained a hallway in the correct location then I used that as the access room. I put it off to the side of the center of the room to avoid blocking the room light and the path through the room (in the case of hallways), but not so far to the side that it blocks doors. There's an extra check for clearance in front of the door in both the floor below and the attic above to make sure the player has enough space to enter and leave at both ends.
The folding ladder activated with the player's interact key and only draw when extended down to the floor. It's very steep, near vertical, and doesn't work well as stairs. I made it function as a ramp instead, using the same code as parking garage ramps. I wanted to make the player climb the ladder slowly, so I decreased player movement speed to only 20% when on the ladder. This partially accounts for the fact that zombies can't yet climb attic ladders. This slow movement makes ladders more risky, because zombies can get you when you're climbing and will sometimes wait for you at the bottom of the ladder. The attic isn't supposed to be a safe hiding spot. Of course it's also possible to jump down from the attic on the opposite of the opening from the ladder and land in the room below quickly.
Attic access door and extended ladder in the hallway of a house shown with indirect lighting.
Attic Lighting
Lighting works differently in attics. I don't have a flat ceiling to add a standard rectangular or flat cylindrical light to, so instead I hung spherical lights from the center ceiling beam. Shorter/square attics have a single large light, while longer attics have two lights, one near each end. Attics will be full of random large objects, which creates many shadows. In addition, the light radius and field of view aren't large enough to reach into the corners. I increased the indirect lighting contribution in attics to make objects further from the lights actually visible. I still get nice dark areas in the occluded corners behind larger objects and brighter spots in front of objects, which can be seen in the various screenshots in this post. While this high level of indirect lighting is better for taking screenshots, I may reduce the indirect lighting later because I rather like the creepy dark corners of the attics.
I said earlier that I still haven't completed indirect lighting. At this point it's mostly a problem with performance vs. noise. I can't get low noise with good CPU compute time for volumetric indirect lighting. However, attics are a bit easier since they're one room with only 1-2 lights. I can increase the number of simulated rays and get results in reasonable runtime with acceptable noise. So I've enabled indirect lighting for attics, since I feel it improves the look quite a bit compared to using a constant ambient lighting term. I'll likely get into more detail on this topic in a future post.
Long attic under a gabled roof with a rug in the distance and many objects scattered about. A rat can be seen on the attic floor.
Object Placement
Next I'll discuss object placement. Most attics that I've seen are full of complex wood beams that hold up the roof. I'm not sure what the correct term for these different parts are, so I'll just refer to them as "woodwork". I suppose the beams that run along the bottom of the roof are rafters, but what are the beams that run along the roof line and the vertical posts called? And what about those horizontal support beams that form a sort of A-frame shape? Whatever these are called, I looked at some reference images of attic interiors and tried to add all of the woodwork. There are two code templates I used, one for peaked/gable roofs and the other for hipped roofs due to the difference in the way the roof polygons are placed. In some cases one or more sides has part of a vertical wall, which I also treat as a "roof polygon". All of these beams start as a cube that's rotated into the proper orientation using lots of complex math involving cross products and trigonometry. It took me many hours to get this right. Since the ends of the beams aren't properly mitered, they don't quite meet exactly and have small gaps and intersections. I did my best to try and hide this with small translates and other geometry. I'm not sure how practical it is to calculate the correct faces/angles for every beam, and if I'll ever have the time and patience for that. It works well enough for now. A lot of that will be hidden in shadow in the final attic anyway.
I would love to have spiders crawling around on the rafters and other beams. So far I haven't figured out quite how to make this happen, given how complex all of the surfaces are. My existing solution based on object building cubes won't work here. In fact the rafters aren't even real collision objects, they're drawn as part of the roof when the player is in the building. Only the vertical posts that the player can run into are real objects. At least I can put spiders and rats on the floor and have them run around among the boxes and other objects.
Attics work as storage rooms, but I can't quite reuse the existing storage room placement logic because of the various differences in the shape of the room and the types of objects to be placed. For sure there are tons of boxes and crates to add. Small furniture and appliances such as lamps, nightstands, and chairs will work for attics. In addition, I can scatter balls, paint cans, books, and various other smaller objects across the floor and on top of larger placed objects. (I was thinking of adding something larger such as a dresser, but that currently can't fit through the opening for the attic door. I'm not sure how someone would get it up the narrow attic ladder either.) The more cluttered the better, as long as the player is able to pick up and/or move these objects to clear a path to walk. It might be nice to add some unique items that are only found in attics such as kid's toys. It would be neat to have a rocking chair or horse that the player can push to make it rock back and forth.I'll have to see what free 3D models I can find online.
Attic with an open access door, a chimney passing through it in the back right, and indirect lighting casting soft shadows.
Furnaces
I've also added furnaces to some attics. Furnaces were another side project for me. I've had them on my to-do list for a while, ever since I added vents to office buildings. I started with adding furnaces to houses because at least I know what they should look like from experience. The houses I've lived in have mostly had their furnaces in the basements or attics. The house I currently live in has the furnace in a small room off the central hallway, but I don't think that's as common. For 3DWorld, I added the furnace in the same room as the water heater if the house has a basement. Otherwise, I add it in the attic if there is one. I couldn't find a good 3D model, so I took a picture of my furnace, did a poor job of editing it and trying to fix the slight rotation, and slapped that on as a texture. I couldn't get a picture from the optimal angle and the lighting wasn't great. The various pipes that come out the front aren't properly 3D, but it works well enough. It's obviously a furnace. I'll need to add all of the duct-work and actual pipe geometry later. That should add a lot of more clutter to the attic, though I need to be careful that it doesn't block the player's path too much since these objects won't be movable by the player.
House basements now have gas lines that connect to the stove, water heater, and fireplace. I've made gas lines connect to furnaces above the basement as well. However, the only case where a furnace is above the basement is when it's in the attic, and that only happens when there's no basement to put it in, so the pipes won't be visible anyway. I'm sure I'll get back to this at some point. One possibility is to make the furnace placement random when the house has both a basement and an attic.
Attic under a hipped roof with a furnace in the back left.