Sunday, December 12, 2021

Procedural Cities: More Power

I'm continuing to work on power lines connecting the buildings in my procedural cities. This is a follow up to the previous post where I first introduced power poles in residential cities. This time around I've improved the graphics, fixed wires intersecting buildings, added power poles and substations to cities, and connected cities together with transmission lines.

The graphics improvements are relatively minor. I replaced the simple truncated cone insulating standoffs used for wires with more complex accordion-like cone segments I see in reference images.

Power Lines to Houses

The screenshots in my last post showed some power wires connected from the lines near poles directly to the roofs of houses. I set the connection point as the point closest to the road on the highest part of the roof. That didn't look quite right, so I added those vertical metal conduits that protect the wires running into houses. This also avoids having wires clip through the edges of solar panels placed on the same section of roof as the wire start point.

I fixed the problem of wires sometimes clipping through other parts of the house or adjacent houses. The previous placement algorithm always connected each house to the nearest power pole. Now I do an intersection check of each wire with all nearby buildings, including the building the wire connects to. If an intersection is found, the next closest pole is chosen, until there are none left to try in the block the house resides in. Most of the time the closest (first) pole is valid and is selected. Occasionally this can still fail, but there were only around 20 failures out of the ~3000 connected houses.

Power connection from the roof of a house to the wires near a power pole. (Also, my above ground swimming pools now have ladders.)

Commercial Cities

As stated in the last post, most commercial office buildings are connected to the power grid through underground line rather than overhead wires. I do like the look of the power poles though, and they still need to provide power to city streetlights. I decided to add power poles and power lines to commercial cities, but have the building power routed into the ground through conduits. This is what I see in the office buildings and stores around my house in real life.

In addition, I found a "power substation" model that I can place on the concrete near the sidewalk on some blocks. This is the big metal transformer box with cooling fins that you tend to find behind buildings and on the sides of parking lots. These are placed when there's room for them. Here is what a power substation looks like placed in one of my cities.

Power substation/transformer next to the sidewalk.

Transmission Lines

I added transmission lines that connect the power grids of cities to their neighbors. Each line connects a pair of cities so that the entire set of cities is fully connected in a cycle free graph. This requires placing (num_cities - 1) transmission lines. I start with the closest two cities, connect them, then continue to add the closest city to the connected set until there are none left. In theory, it's possible that some connections fail and not all cities can be connected to the grid, but I haven't seen that happen yet.

I borrowed some of the path placement and cost estimate code from the city connector road placement algorithm. The placer will consider several points along the edges and corners of cities, typically within the pair of shared projecting edges of the two cities (if there is one). Otherwise, it will try to connect the nearest pair of corners to each other. A cost is calculated for each candidate, and the lowest cost legal path is chosen. Each connection is formed by a series of regularly spaced towers that follow the contour/elevation of the terrain, with three wires connected to insulating standoffs on each tower. Cost includes both the length and elevation change, similar to road placement.

If the terrain is very steep, the placer will try to insert additional towers that follow the terrain height to keep the wires from getting too close to the ground below. If this still isn't enough to fix the problem, the placement fails and another candidate path is chosen. If none of the paths are valid, these two cities are considered unconnectable, and a different pair of cities is chosen instead. This continues until each city has been connected to the grid, or all pairs of cities have been considered.

Transmission line with three wires on insulating standoffs, connecting power between two cities.


Transmission line routing is generally more likely to succeed than road placement because they can climb steeper terrain and aren't required to run in X (east-west) or Y (north-south) directions. Lines can cut across the terrain diagonally and can have any angle jogs to connect to the city power poles at their endpoints.

Next I had to ensure there were no trees or secondary buildings under or intersecting the transmission lines. The check for trees was actually quite difficult, and required various significant changes to the tree placement code. I also had to look up and implement some new math functions such as point-line segment distance calculations. In the end it worked well though, and gave me nice clear paths around the transmission lines like this.

Trees and other large plants have been cleared from the transmission line right of way.

Here's what a transmission line looks like when climbing over a mountain. In this case, the mountain range runs between the two cities with no convenient pass between them, so the only way to connect the cities is through the mountains. There's another mountain range on the other side of the city that blocks the power connection to its opposite neighbor. The placement algorithm examines multiple potential candidates before selecting this one.

Transmission lines are allowed to climb steep hills if there's no lower cost path. Towers are spaced more closely together in steep areas to keep the wires away from the ground.

That's looking pretty good, but there's still some work to do. I have to decide what to do about secondary buildings near power lines. I have checks in place that skip these buildings similar to how trees are skipped, but it doesn't look as good. The lines and towers are too close to houses, and the big gap with no buildings looks unrealistic. Plus it scrambles up the building placement so that I get randomly different buildings in the player's starting location every time I change the transmission line code. I feel the high-level building placement algorithm should somehow consider transmission lines when selecting building density or zoning in different areas.

Saturday, November 20, 2021

Power Lines for Procedural Cities

I've made a lot of recent progress on 3DWorld's procedural cities, in particular the residential neighborhoods. They've definitely improved over the past few months as I've added fences, swimming pools, etc.

I walked around outside in my real life neighborhood to try and observe what objects I was missing in my scenes. One type item that stood out was telephone poles. I can add these as well as the wires that distribute power along the roads in my cities. Since I'm only going to create the power lines for now, and not the telephone wires, I'll call these "power poles" for the remainder of this post to match the name I use in the source code.

I started by adding wooden poles along one side of the road in both north-south and east-west directions. A single pole is placed halfway between each block/plot in each dimension, and a pole is placed in the corner of each intersection to connect the wires running in orthogonal directions. Then I added wooden cross beams to the tops of each pole to hold the wires. These are at different heights for each N-S/E-W direction at the corner pole to keep the wires from intersecting and shorting out.

Next, I added the wires themselves. A set of three high voltage wires run across the tops of the poles, while a stack of three low voltage wires are spaced vertically below them. I modeled wires as long thin black cubes. Making them pure black avoids having any shading that varies with lighting calculated from the vertex normals. This makes it impossible to tell that these are cubes rather than cylinders, unless you're looking into the square cross section of the end of the wire. Wires are attached to the pole and cross beams with white ceramic insulating standoffs. These are only drawn when the player is close as an optimization.

Power poles at intersections that connect wires running in the two directions have additional wires that connect the upper and lower set of three high voltage lines. They also have a transformer with connections between the high voltage and low voltage sets of wires. All of this produces a fully connected and electrically sound power grid. Real power grids don't have redundant connections that create loops, but this is close enough.

Finally, I connect houses and streetlights to the low voltage power lines with additional wires. Houses connect to points near the closest power pole. Streetlights connect to the closest low voltage wires, which are generally either the ones directly above the streetlight or directly across the street from it. The thinner wires connecting houses and streetlights to the low voltage power lines are drawn as a single wire rather than three separate wires to simplify the code. This effectively treats them as three bundled wires braided/wrapped around a steel support cable, as is common in residential areas. This multi-wire is connected to the three wires stretching between poles with a short vertical wire segment.

Here is an example of my power poles and power lines viewed at street level. I think I have the basic scales and styles pretty close to the reference images I used of real power lines.

Power lines connecting to houses and streetlights as viewed from the ground.
Everything is drawn with level of detail (LOD) based on a combination of object size and distance to the camera so that smaller objects are only drawn when the player is close by. In addition, cylinders and truncated cones are drawn with fewer vertices/divisions when further from the player. I use the bounding cubes of groups of wires and the poles themselves for view frustum culling to avoid drawing components that aren't visible to the player. The average draw time for all of these additional features is only around 1.5% of the total scene draw time.

One tricky problem was handling the power poles on the edges and corners of the grid. This can only happen for the poles placed at the corners of intersections as the remaining poles are placed on the interior of the city blocks. These power poles must be handled as special cases because the wires only connect in a subset of the directions and must be properly terminated at insulating standoffs. Poles on the edges connect with wires in three directions rather than four, while poles on the four corners of the grid only connect in two directions. In addition, the wires connecting to the transformer and between the upper and lower high voltage triplets must be moved to the direction of the pole facing the interior of the city. This allows the vertical connecting wires to connect properly to wires above and below.

Here's a second example, viewed from above with the camera in "flight" mode. Can you actually tell that these wires are cubes rather than cylinders? I can't.

Power line grid following roads, viewed from above.
This looks pretty good for now. I may add larger metal transmission lines connecting the different cities to each other at some point in the future. I don't have any generators or other sources of power to connect these to at this time. I haven't decided what to do about commercial cities with office buildings yet because the power lines are more likely to intersect with the larger buildings. Maybe it's okay to assume these cities use underground power lines and omit the poles.

Thursday, November 4, 2021

Butterflies

I showed some images of new clothing and hanger models in closets in the last post. While I was looking for clothing models, I came across a monarch butterfly model created by Paul Spooner and decided to add that to 3DWorld. This somewhat fits with my "animals" module, which previously included only birds and fish. So, surprise! This isn't another update on buildings or cities. I'm going back and working on procedural generation in nature.

Butterflies, like birds, are flying animals. Flying and swimming animals such as fish are easier to implement than animals walking on the ground in some ways, and more difficult in other ways. Their physics tends to be more complex because it's all in 3D with a vertical elevation component. On the other hand, collision detection is easier since there aren't as many objects to collide with in the air and water. In fact, the probability of two animals colliding is low enough that I can basically ignore it.

Butterflies inherit from my animal C++ class and share some of the code with birds and fish. For example, they share code for random spawning within a terrain tile, logic to allow them to cross between tiles, per-frame physics updates, visibility queries, and drawing. What else can I share with the existing code? Let's see, I can reuse the 3D model drawing code with all of the orientation transform code from fish. (Birds are drawn as three flattened spheres rather than 3D models.) I can reuse the simple wing animation logic from birds. The steering behavior can be somewhat reused from the random walk of both fish and birds, though I certainly have to extend this system. I suppose I need logic to choose destinations and fly to them as well, because butterflies tend to land on plants and other objects. I don't have any code for that in the fish or birds system, but I can use a similar model to cars and pedestrians. So it looks like all the major components are there. I just have to copy/paste the right pieces and/or factor out the reusable parts.

The first task was to list all of the features I planned to add, in the order I planned to add them:

  • Loading and drawing of butterfly 3D model
  • Spawning in appropriate areas of tiles (over grass, avoiding water/rock/snow/cities)
  • Flight logic with random walk
  • Collision detection with scene objects (terrain, trees, plants, buildings, etc.)
  • Wing animation (model split into body + two rotating wings)
  • Choice of destination and logic to fly to destination
  • Optimizations
  • Color and wing pattern variations

Loading the model, drawing, and setting spawn points was pretty easy. Of course I had the size scale way off on my first attempt:

My first attempt: The Attack of the Giant Butterflies

At least the butterflies aren't hard to find! One side effect was that it was pretty easy to tune the model drawing and animation code when they're this large and easy to see.

It took me a few attempts to animate these models. I eventually decided to use a sine wave to rotate the wings 45 degrees about the body in opposite directions for each side. This isn't perfect as the wings clip slightly through each other and through the body. I watched a video showing butterflies moving in slow motion for reference. It seems like their wings don't quite rotate about a point as a rigid body as I was attempting to imitate. Instead, they flop around and bend like stiff cloth or paper. While my solution doesn't look great when viewing a stationary butterfly close up, it's actually difficult to spot the self intersections once the butterfly is small and moving in erratic patterns.

Flight logic was an interesting topic, and probably the one I spent the most total time on. Real butterflies don't fly in straight lines; their paths are much more random. This applies to their altitude as well as their heading. I decided to keep the butterfly model level with the ground and split the movement into an XY component parallel to the ground and a vertical (Z) altitude component. The variables controlling motion are:

  • Speed (affects movement speed, turn rate, and wing flap rate; tied to realtime)
  • Rotation angle about vertical/Z axis / in XY plane to control direction
  • Vertical acceleration to change altitude

I wanted to ensure very smooth movement, so I chose to add a random value to an accumulator for each of these variables each frame. The accumulator is then integrated over time to calculate an acceleration, which is then multiplied by time to get velocity, which is then multiplied by time again to update the position and direction of the butterfly. This should guarantee the path is second order continuous. All variables are clamped to a reasonable value at the end of a physics update. This includes caps for min and max altitude, max speed, max turn rate, etc. There are lots of constants I had to keep adjusting to get reasonable behavior, and now butterflies fly around in crazy random paths in an unpredictable way. Just like in real life!

Then I added code to choose destination points. I have flowers in the grass, but there are thousands of them per tile. Flowers are drawn using instancing and aren't actual game objects. This means I can't easily choose them as destinations. I went with using the tops of various types of plants as destinations instead, since butterflies often land on leaves. Butterflies in cities will choose to land on the grass in parks, if there's a park nearby. Otherwise they simply fly around randomly and try to avoid the buildings.

Their behavior finite state machine actually has four states: explore, find destination, approach, and rest. Butterflies start out in the "explore" state. After some time has elapsed, they will enter the "find destination" state and every so often will consider a random plant or park. If they find one that's close by and visible, they will enter the "approach" state. After landing at their destination they enter the "rest" state for a few seconds, then take off with a vertical ascent and transition back to the "explore" state. This logic results in butterflies moving from plant to plant in a slow, winding path.

Choosing destinations was easy; actually getting them to fly there was much more difficult. How exactly is this crazy random flight path supposed to end the butterfly at a particular location? After some experimenting, I decided to use the distance to the destination to blend between "explore" and "approach" behaviors. The approach force increases as the distance to the destination decreases. At first, when they're far away, there will be a weak force pulling them toward the destination. The random behavior will mostly override this force, but they will slowly drift toward the destination over time. As they get closer, the approach force will increase in strength, allowing them to eventually home in on their target. They may take a very roundabout path, but they do eventually get there. It could be in tens of seconds or a few minutes. It took many attempts to avoid the oscillation behavior during these state transitions, especially when they're very close to the destination but have the wrong altitude.

When I first implemented this I had no idea why the butterflies [mis-]behaved the way they did. I had to add debug visualization to show their flight path as a string of spheres, their destination point, and the line to their destination. The line color reflects the magnitude of the approach force: blue for weak, red for strong. These debug visuals also helped me find the butterflies in the scene, which are super tiny compared to the mountains, buildings, and trees. Here's an example where I have the debug visualization turned on but the trees and grass turned off.

Butterfly path and destination debug visualizations helped me get the logic right. It's obvious how their paths are nowhere near a straight line.

You can see just how wavy some of those paths are. This debug mode definitely helped, and I was eventually able to get everything working. Here's a video where I follow a butterfly around for a minute or so as it lands on a plant and takes off again.

I had to add a LOD (level of detail) optimization where the body and legs weren't draw unless the butterfly was close to the player. The only other optimization that was needed was better early rejection of trees and plants during collision detection. I reused the code I had for player sphere collisions, and it was never optimized for use with a thousand actors.

The final step was adding wing color and texture variation. The initial texture had the wing colors baked into the same texture atlas as the body. Paul sent me a texture with white wings that I was able to recolor in my code by overriding the model's material color per butterfly instance. I added a mix of monarchs and butterflies with white, yellow, orange, blue, and violet wing markings. These single colors don't look as nice as the multiple colors in the monarchs, but at least they add more color variety. I've taken a screenshot of a three butterflies here: monarch, yellow, and violet.

I added some other butterfly colors mixed in with the monarchs. Do you see the violet one on the right?

I created a second video with a large number of butterflies. There are thousands in this scene. The player is free to move anywhere in the world and new tiles with new butterflies will be generated around them.


I'm pretty happy with how this mini project turned out. It was a week well spent. Is it time to add other animals or insects, or time to get back to cities and buildings? I don't know, I guess we'll have to wait and see.

If I do decide to continue with butterflies, I might add a mating dance between males and females. I'm sure that getting the motion correct for a pair of them should be trivial. Right?

The source code for butterflies can be found here if you're interested.

Sunday, October 24, 2021

Procedural Buildings: Clothes Hanging in Closets

I showed some simple colored, 2D textured billboard shirts hanging in closets in the previous post. Various people, including my daughter, commented that they didn't look very much like real shirts. That's true! Fortunately, Paul Spooner offered to create some proper 3D models of shirts, pants, and clothes hangers. I was able to replace my temporary shirts and hangers with these improved models and add actual 3D volume to these objects, as well as an increased amount of variety.

Of course this wasn't trivial. There was some work involved in integrating new classes of 3D models into 3DWorld's object management framework. First, I had to add support for multiple 3D models of the same object type for building interiors, similar to what I had to implement with cars and people. Then I had to add flags for models to enable two sided lighting, change the rotation point, override the default texture, and extract the object name from the model filename. All of these features will likely be useful in the future. In fact I've already started incorporating some of these features into the other (existing) types of room objects.

Here are some screenshots showing the current contents of closets. There are five different hangers, a tee shirt, a long sleeve shirt, and hanging pants. Some of the shirts are textured, while others are brightly colored. The player can steal the clothes and hangers, as well as push/rotate them to the sides by walking through them in the closet.

The original shirt models, textured with a logo.

Adding some colored shirts, but keeping the pants gray. The yellow shirt on the left is too bright, so I've replaced it with dark green.

The shirts here are placed too close together, and the yellow and white shirts intersect. I've fixed this by replacing a shirt or pants with an empty hanger in this case.

Shirts on the left, pants on the right. Everything casts a shadow.

Shirts and pants hanging in a closet with a lamp and box at the bottom. Some of them have been rotated.

I think closet interiors would look better if there was better ambient lighting. I haven't quite figured out how to do that efficiently yet. I'll post updated screenshots if I can find a way to improve this. Also, the clothes hangers are very thin, which makes their shadows blocky when viewed up close. It would definitely work better if I could somehow make that circular light source a small area light rather than a point light as that would give it softer shadows.

What's the next step? Maybe adding clothes to dresser drawers?

Saturday, October 16, 2021

Procedural City: Residential Updates

I've been working on a variety of different aspects of 3DWorld's procedural city over the past few weeks rather than a single larger topic. I decided to just combine everything together rather than making lots of small posts. This post shows the major additions and improvements I've made, starting with exterior changes and ending with interior changes.

Cars Entering/Leaving Driveways

This task took by far the most time due to the complexity of the logic required to implement it. Up until now, cars would choose destination intersections and drive between them, meaning they were always actively moving on the road network. Parked cars stayed parked forever. I added a config file option to allow a certain percentage of cars to enter driveways and temporarily park. After a few minutes have elapsed, they start up again, back out of the driveway, and continue to a different destination. This was more complex than it sounds because I had to handle both the car physics for these turns and the logic to avoid hitting other cars and people in the process.

I started with a reservation system for driveways so that no two cars try to use the same driveway at the same time. Some cars are always parked and will reserve their driveway forever, but the other driveways are available to the first taker. I limit usable driveways to ones that are long enough to fit the current car or truck without requiring the garage door to be open. While destination intersections can be in other cities, destination driveways are always in the city the car is currently in. This simplifies the logic a bit.

The most difficult step was determining when it was safe for cars to enter and leave driveways. They always pull in, and either back out or pull out depending on the orientation they started in. The tricky case is when a car is making a left turn into a driveway and needs to check for traffic in the opposite lane that it will be crossing. It's not enough to check for cars blocking the driveway at the current point in time, they need to find all cars that can potentially cross that path for the duration of their turn. This involves locating nearby cars on the current road and cars about to turn onto the road and predicting where they will be a few seconds in the future using their distance, current speed, and max speed. The test is somewhat conservative to add a safety margin. The case where a car is backing or pulling out is similar, except it needs additional time when backing out to switch from reverse to forward. However, once they're on the road, cars behind them will see them and stop if needed. So it doesn't need to be as conservative. Cars exiting driveways must also check for cars stopped at a red light and blocking the driveway, and wait until their path is clear.

Sometimes when the driveway is close to an intersection, it can be blocked for long periods of time, preventing cars from entering or leaving it. It's generally okay to let a car sit there and wait to exit a driveway. However, there's only one lane (no dedicated left turn lane), so a car stopped waiting for a left turn will block traffic on its side of the road. This can lead to gridlock, especially when this happens on both sides of the road at the same time. My fix is to have the car only wait a short time and continue to loop around the block if the driveway is blocked by a stopped car. This can result in the car looping around the block forever, but at least the system doesn't deadlock.

Here's a video showing a car entering and leaving a driveway. The video is sped up a bit, and the time a car waits in the driveway was reduced from a few minutes to a few seconds. Yes, I added back up lights.


The next step was to make these cars avoid hitting pedestrians who were walking on the sidewalk between the road and driveway. This was challenging because car and pedestrian update logic is run on two different threads at the same time, which means the cars and pedestrians can't directly access each other. I couldn't figure out how to make the cars stop to avoid pedestrians, but I did eventually figure out how to make people stop at the edges of driveways to avoid cars. The logic for this is different for cars entering driveways, leaving driveways, and parked in driveways. It's similar to the logic used for pedestrians crossing roads, except with driveways instead. It's similar to the car driveway entrance and exit checks as well because it also involves predicting the paths of nearby cars.

The system works in many cases, but there are some modes of failure. For example, pedestrians can block each other or push each other into driveways. It's possible for a car to start backing up just as someone crossed into the driveway behind it. I could add a flag to the driveway indicating a person was in it to keep cars from moving. But I'm worried that this can lead to a dependency cycle where one or more pedestrians and one or more cars are all waiting for each other to move, and none of them can make progress.

There's also the case where someone will walk around an obstacle such as a fire hydrant or another person, slightly into the road, bypassing the driveway. To handle this case, I extend the driveway partially out into the road. But then there's the even more difficult case where a pedestrian decides to cross the road directly in front of the driveway. They may stop there waiting for a car to pass before crossing, blocking the driveway in the process. It's not clear how to fix this. Even if the car was aware of this person, all it could do was wait for the person to move. So it seems that this situation must be resolved by the pedestrian moving ... somewhere. Maybe to the side of the driveway? Maybe I shouldn't let people cross in front of driveways in the first place? It's difficult to work on this because this situation is rare, and the simulation isn't deterministic enough for me to reproduce the same failure mode between tests. I saw this particular failure only once.

Here's a video where a pedestrian stops to wait for the car to enter the driveway rather than being run over.

The first time I saw this interaction there was another pedestrian coming from the other direction later who had to wait for the car to exit the driveway. That would have made a better video, but I failed to record it correctly that time and wasn't able to witness this happening again. Minor changes to the AI logic results in major changes in the simulation.

Above Ground Swimming Pools and Chain Link Fences

I showed off some in-ground swimming pools in the previous blog post. This time I've added above ground pools as well. In addition, I've placed chain link fences around the houses to separate the pools (typically in private back yards) from the public area and road.

Residential neighborhood with both in-ground and above-ground pools, surrounded by fences.


The fence placement logic was more complex than I expected because it had to avoid crossing the driveway, other fences/walls/hedges, trees, and AC units on the side of the house. I also added checks for fences blocking porches and exterior doors. The final placement algorithm is able to fully fence off around 90% of pools and will remove the pool and fence segments when it fails. This should ensure no pools are publicly accessible and all meet local safety requirements. Maybe people will be hit by cars when crossing driveways, but they won't be drowning in their neighbors' pools.

These screenshots show how a pool is fenced off on both sides of the house, and a close-up of a chain link fence.

A house with a back yard in-ground pool fenced off with a chain link fence on both sides.

Close-up of a chain line fence constructed of metal cube bars and an alpha mask chain link texture. The gap on the left is there because it doesn't know the width of the wall/fence/hedges that will be placed on the left side at the time where the fence is added.

Improved Hedges

Residential plots are separated by a combination of fences, walls, and hedges. I was previously drawing hedges as simple textured cubes. That may be okay for fences and walls, but plants are shaped more organically than cubes. They look fine from a distance, but bad close up. I decided to generate a cube-shaped shell of leaves draw as individual quads in random orientations, and instance these over nearby hedges. This adds no measurable frame time but definitely improves the look. The new hedges have more detail and volume, though you can still see the underlying cubes if you get close enough.

New and improved hedges that have random leaves sticking out of a textured cube to give them more detail and volume.

Umbrellas

This was a silly one-off change. I thought it would be interesting to add umbrellas to most of the pedestrians when they were walking outside in the rain. (Yes, I do have full weather simulation and effects that work in all gameplay modes.) I found a simple umbrella 3D model online and added code to draw it above 75% of people when it's raining outside. Here is what that looks like.

A partly cloudy, rainy day where most of the people on the sidewalks are carrying umbrellas.

Pushable Objects

Now we get to the changes I made to building interiors.

I added a gameplay action key to allow the player to push objects placed inside buildings. This works with smaller objects that can be picked up and carried such as chairs and small tables. It also works with large furniture and appliances that are too heavy for the player to steal such as refrigerators, couches, beds, dressers, and bookcases. Basically anything not attached to the wall or floor is pushable. The heavier the item, the longer it takes to push it around. I allow the player to push items into closets but not out of their starting rooms, to keep the pushing logic simple. Items can be pushed into doorways or against doors to prevent them from being used. This is helpful for keeping zombies out of certain rooms, but can also restrict the player's movement. I later added another key to pull objects so that they can be moved away from doors, etc.

There are now separate keys for "take", "interact", "push", "pull", and "flashlight". I had to add multiple player crosshair colors and shapes to indicate which items can be taken vs. interacted with vs. only pushed/pulled.

Rolls of Tape

This was a fun mini-project to work on. I already had spray paint, markers, and toilet paper that the player could make a mess with in gameplay mode. I decided to add rolls of duct tape that could be used to stick tape on objects and wrap it around building interiors. Tape rolls of various colors can be found in drawers, in boxes, and on shelves. These can be picked up and used by the player. The action key will toggle between "stick tape to nearest object" and "rip off tape and stick the end to something". In between the tape will unroll as the player walks around, wrapping around objects such as walls, doors, and furniture along the way. The tape roll will shrink along the way and eventually run out, but the player can also backtrack to remove and recover the last unstuck segment.

Here's an example screenshot of two colors of tape stretched across a hallway.

My artwork created with black and gray duct tape stuck to the walls of this hallway.

This doesn't work perfectly. Sometimes tape will go slightly through objects, or won't stick to them in the correct places because their bounding/collision shapes don't exactly match how they're drawn. There's also no collision detection between the player and building AI people vs. the tape. Oh, and it doesn't quite work right if you try to pull a line of tape into the elevator with you and go to a different floor. I have no idea how to handle that case. I suppose the tape should break as it likely would in that situation in real life. But on the plus side it's fast enough that you can put down a ton of tape, and it stays in the buildings forever.

There's no real gameplay mechanic for tape at the moment. It's the same for spray paint, markers, and toilet paper. Maybe at some point I'll allow the player to block off doorways, hallways, or objects with tape to limit the movement of enemy zombies. It could be too overpowered though. I also feel that the tape should restrict the player as well, but then I would have to add a tape removal mechanic to keep the player from trapping themselves in a room. (This is also why I had to add a "pull" action to counter the "push" action.)

Improved Basements

The basements in some houses didn't look very much like basements, and were a bit disorienting with their random interconnected rooms. I added more basement items, including water heaters with pipes and laundry baskets in laundry rooms. I also made the exterior walls a darker concrete block texture that has good contrast with the stucco/plaster interior walls. Knowing where the exterior walls are helps the player navigate in the basements of large/complex houses in the absence of windows.

Here's an example of the new basement look. The planet picture looks a bit odd here, but I don't feel the need to change that right now.

The new basement look: water heater, laundry basket, and concrete block exterior walls. I'm still holding the infamous tape roll I used in that hallway above.
   

Close-up of a water heater, complete with warning label. Only some of them have the label.

Clothing

I've finally started to add clothing, beginning with colored shirts hanging in closets. Right now they're simple 2D textured billboards with alpha masks to make the edges of the quads (outside of the shirt fabric) transparent. I haven't figured out how to make them properly 3D, due to a combination of performance issues with high vertex count models, and the lack of free shirt 3D models. At least they're properly hung on the hangers and cast nice shadows. And as always, the player can steal both the shirts and the hangers.

Colored shirts hanging in the closet, drawn as alpha masked billboard quads.

I plan to make them sway back and forth when the player bumps into them eventually. That seems like a lot of complexity to add for such a simple effect though. Maybe I'll also add some designs or logos to shirts.

Saturday, September 4, 2021

Residential Neighborhood Improvements

This is just a short post on my improvements to 3DWorld's residential neighborhoods. I've now fixed most of the problems with driveways and garages. For example, I widened the right angle bends of driveways coming out of garages so that cars should have enough space to turn. I added walls, fences, and hedges to separate the different yards from each other. I also added in-ground rectangular swimming pools to some of the back yards.

Here's an update screenshot. You can see that I now allow a mix of commercial office buildings and residential cities.

Residential city with skyscrapers in the background. There are now walls, fences, hedges, and swimming pools.

And here's a screenshot with cars and people enabled. I fixed the placement of swimming pools so that they're not next to roads.

Residential city with cars and pedestrians enabled.

I spent some time working on pedestrian path finding for residential areas. I might post a longer discussion on this, but here's a brief overview of the system. People are randomly spawned on a sidewalk outside the player's view. Each person has a destination in their current city, which can either be the door of a house or a car parked in a driveway. Pedestrians now walk on the sidewalks next to roads rather than through city blocks and yards. I moved the streetlights, traffic lights, and fire hydrants off the middle of the sidewalk and to the edge of the road to allow them more collision-free space for walking.

A unique requirement of residential cities is that people can't walk through other residents' yards, except for their neighbors in the same block if there are no fences, walls, or hedges around the property. This initially created some problems where people got stuck against fences/walls/hedges trying to go around the block to get to their destination. My final solution was to first place their target at the point on the sidewalk closest to their destination house or car. When they're close enough to this point (within the axis aligned projection of the house/car onto the sidewalk), they can walk into their own yard to complete the path. That worked surprisingly well compared to some of the other things I tried.

Monday, August 30, 2021

Connecting Procedural Cities with Roads

It's time to revisit my city connector roads, which I implemented a few years ago but haven't touched since then. The problem statement is that I've generated some number of procedural cities (8 in this example) on the island map, and I want to connect them to each other with roads that cars can use to drive between cities. There are constraints that roads can't intersect each other or the wrong city, can't travel over water, and have a limit on slope when following the terrain. The goal is to find a lowest cost valid path from one city to the other taking into account path length, elevation change, and number of turns. There's also an option to add bridges and tunnels to span areas of high elevation change. Bridges are added when their construction cost (based on span length) is lower than the cost of filling in the terrain under the road, in cases where the terrain is too steep for the road to follow it. Tunnels involve weighing the cost of cutting through terrain vs. leveling it out to a reasonable grade.

The original code created two types of connector roads, a straight road from one city to the other, and a road consisting of an east/west segment and a north/south segment with a single bend between them. These two types of roads were enough to connect most of the cities together. One simple improvement is to allow connecting cities with a path having a single jog consisting of three segments plus two bends. This is just one more segment and one more bend than the previous case, but the existing code is very messy and special cased.

The first task was to separate out the various blocks of code that assign the road points/segments, determine if segments are valid, calculate segment cost, actually place the roads, and connect the segments to the road graph so that cars can navigate them. The goal is to have these different pieces be modular so that I can select between different road assignment algorithms and share the rest of the code. The optimal structure is for these stages to create or take a list of points defining the path of the road, where the road itself is constructed by expanding the segments between points by the half width of the road. This transform replaces the 2D rectangular area math with a simpler points-and-lines system. Since the roads are all a constant width, it's also possible to expand the collision objects by the road half width so that collision tests can use faster point containment checks rather than box overlap checks.

With that refactoring out of the way, I was able to experiment with new routing solutions. I first added the three segment roads and fought to make the road placement system accept that. The results were a bit more optimal in path length and elevation change, but overall didn't look very different. Then I attempted the next big idea of using the terrain heightmap with a path finding algorithm that traced the road across the heightmap grid to connect the endpoints. The plan was to eventually use the A* (A star) algorithm to improve the speed of the brute force force depth first search. I spent many hours trying to get this working, but had to eventually give up and revert the changes. There were several major problems with this approach:

  1. It was slow. The heightmap is roughly 7000x7000 pixels, which is 50M elements. While most roads only spanned a small subset of the island's area, walking across hundreds of pixels for each road segment to calculate costs took quite some time. This drove the road routing cost from ~50ms to several seconds. Even using the A* algorithm won't get the time down to what it was.
  2. Trying to connect the grids was a huge mess. Each city has its own custom spaced grid of roads that's not aligned to the heightmap grid. A single road is something like 2.35 heightmap pixels wide, not an integer value. I had to create short road segments to connect the point on the city road grids at each end of the path to the heightmap grid, where the connectors were odd off-grid segments. This caused a lot of problems with floating-point rounding errors, segment overlap, etc.
  3. I never figured out how to correctly account for the slope of road segments. A single segment is on the order of a hundred terrain grid points in length. Each new grid added to the segment changes the elevation of the endpoint of the road, which affects the slope and the amount of material to add or remove under the road for the entire segment length. In theory I have to recalculate the cost of the entire segment after moving an endpoint. It's not easy to place a global constraint on max segment slope when adding one incremental grid at a time.
  4. I want to minimize the number of right angle bends in the road to make it more realistic. However, it's not clear how to take the number of bends into account when calculating costs for A*. I don't have a good upper bound on the cost of the best path.
  5. I don't actually have a plan for this. I have no reason to believe it will create anything better than what the current (simpler) algorithm will create. Are roads with many bends realistic? Maybe only in the mountains. But the current solution, which tries to avoid mountains to begin with, might do a pretty good job already.

That's a shame. I was really hoping to get some funny road fails such as in my previous post. It looks like I've added a lot of error checks to prevent those problems since then, and I really can't get the road placer to do anything wrong + interesting. No crazy epic fails. It will either fail to add the connection or exit with an error if I try to force it to add strange or incorrect roads. I even tried to create a serpentine road that switched back and forth between different orientations, but I couldn't get it to successfully place any roads like that. I suppose there could be various reasons why. Those roads take more space and are more likely to collide with something, and have higher cost. Having all those short road segments is probably going to fail the max slope checks for at least one location as well. Sorry, I guess I don't have a silly screenshot to post of random switchbacks in the flat plains next to the city.

Anyway, here is what the city connector road network looked like with the old algorithm. Cities are the regular grids, roads are gray lines, and all the small colored squares are buildings. Bridges are white, tunnels are brown, and parks are green. Roads and cities can't be placed over water (blue) or mountains (gray/white). Note that this isn't the full 7Kx7K island; it's closer to 5Kx3K pixels.

Cities and connector roads using the old algorithm. 12 roads, 2 bridges, and 3 tunnels, cost=19.

And here's what I get with the new algorithm that allows three segment/two bend connectors.

Cities and connector roads using the new algorithm. 16 roads, 0 bridges, and 1 tunnel, cost=26.

I count 7 of the new connector road types. There are more roads, but also a higher road cost. This makes sense because cost is summed across all roads in the scene. The average cost per road has increased from 1.58 to 1.69, likely because of the added cost of road bends and the improved ability to connect two distant cities. There's now only one tunnel and no bridges. I believe that's because the new algorithm has more freedom in placing roads due to the extra segment/jog, so it can avoid the cost of building bridges and tunnels to pass through steep terrain.

Is this result better? I'm not sure, maybe. It depends on whether we're trying to maximize connectivity or minimize cost. However, the new algorithm does scramble around all of the secondary buildings. The new building layout around the starting point is now completely different, which makes it easier for me to get lost. I liked the old layout where I knew which buildings had which interesting layouts, architecture, or items. So I think I'll probably keep the old road network, but leave the option to switch to the new one.

Overall, it's not clear if this was a waste of time or not. I definitely cleaned things up in the code, added error checks, experimented with different solutions, and added more configuration options. Maybe I'll get back to this sometime later. Now it's time to move onto something else.

Tuesday, August 10, 2021

Procedural Buildings: House Improvements and Residential Neighborhoods

I've been working on improving the look and placement of procedural houses over the past two months. After finishing up the room object placement project, I went back and made some rooms into garages for houses that didn't already have detached garages. Then I converted the chimneys of some houses from roof decorations to exterior chimney geometry with proper fireplaces. Now that houses are nearing completion, it's time to use them to create proper residential neighborhoods with grassy plots placed inside grids of roads. These changes are described in more detail below.

This post is rather long, and maybe should have been split up into two smaller posts. It started out shorter but kept growing in length as I fixed various problems and added text and images for my fixes.

Garages

I've had detached garages as separate buildings off to the side of houses for a while now. They're relatively rare because they can only be added to the inside part of L-shaped houses without going outside the valid building bounds. Most real houses have garages, so I needed to add additional garages to the main floorplan of some houses.

It was difficult to fit this step into building generation in a way that didn't require significantly changing the control flow. The current house generation algorithm determines the exterior walls first, then places windows and doors, then generates the walls, and finally assigns rooms. Garages are special because they're integrated into all of these steps in some way. The garage is an assigned room, and its door replaces windows and is aligned to the side wall. It wasn't clear exactly where garage assignment should be done in this control flow, because it requires knowing the interior walls before a room can be assigned to be the garage. So I had to special case the garage room assignment to happen earlier in the control flow, just after the interior walls are added. The garage door then removes windows that overlap it. I moved the exterior door assignment after garage selection. If the door is placed too close to the garage door, I move it to the opposite side of the house or choose another door location.

I used several different heuristics to weight rooms as garage candidates, and then choose the candidate with the highest weight. Garages must be large enough to fit the largest sized car (but not a truck), and have a higher weight when their aspect ratio is close to 1.75. Garages also have a higher weight if they have exactly one door to the house, and a high weight if they're against an exterior wall on two sides. They must have at least one exterior wall to place the door in.

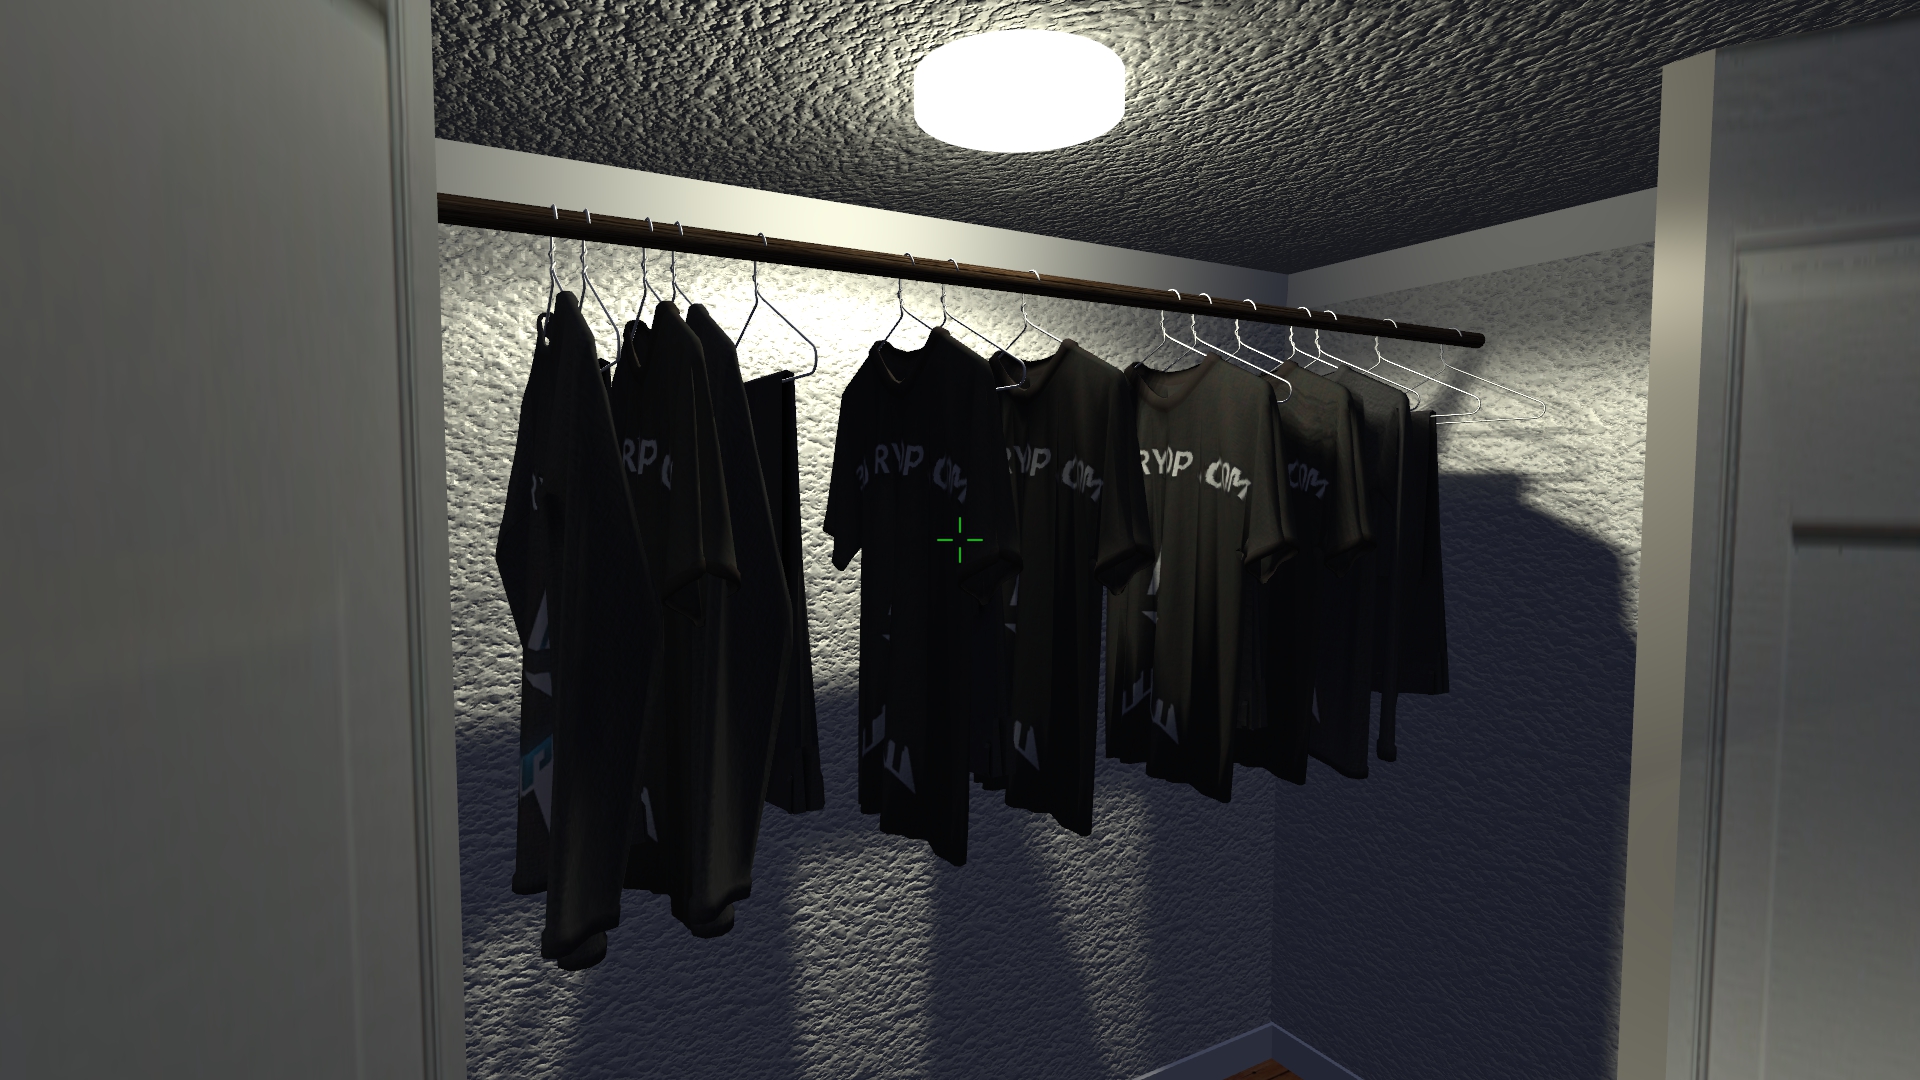
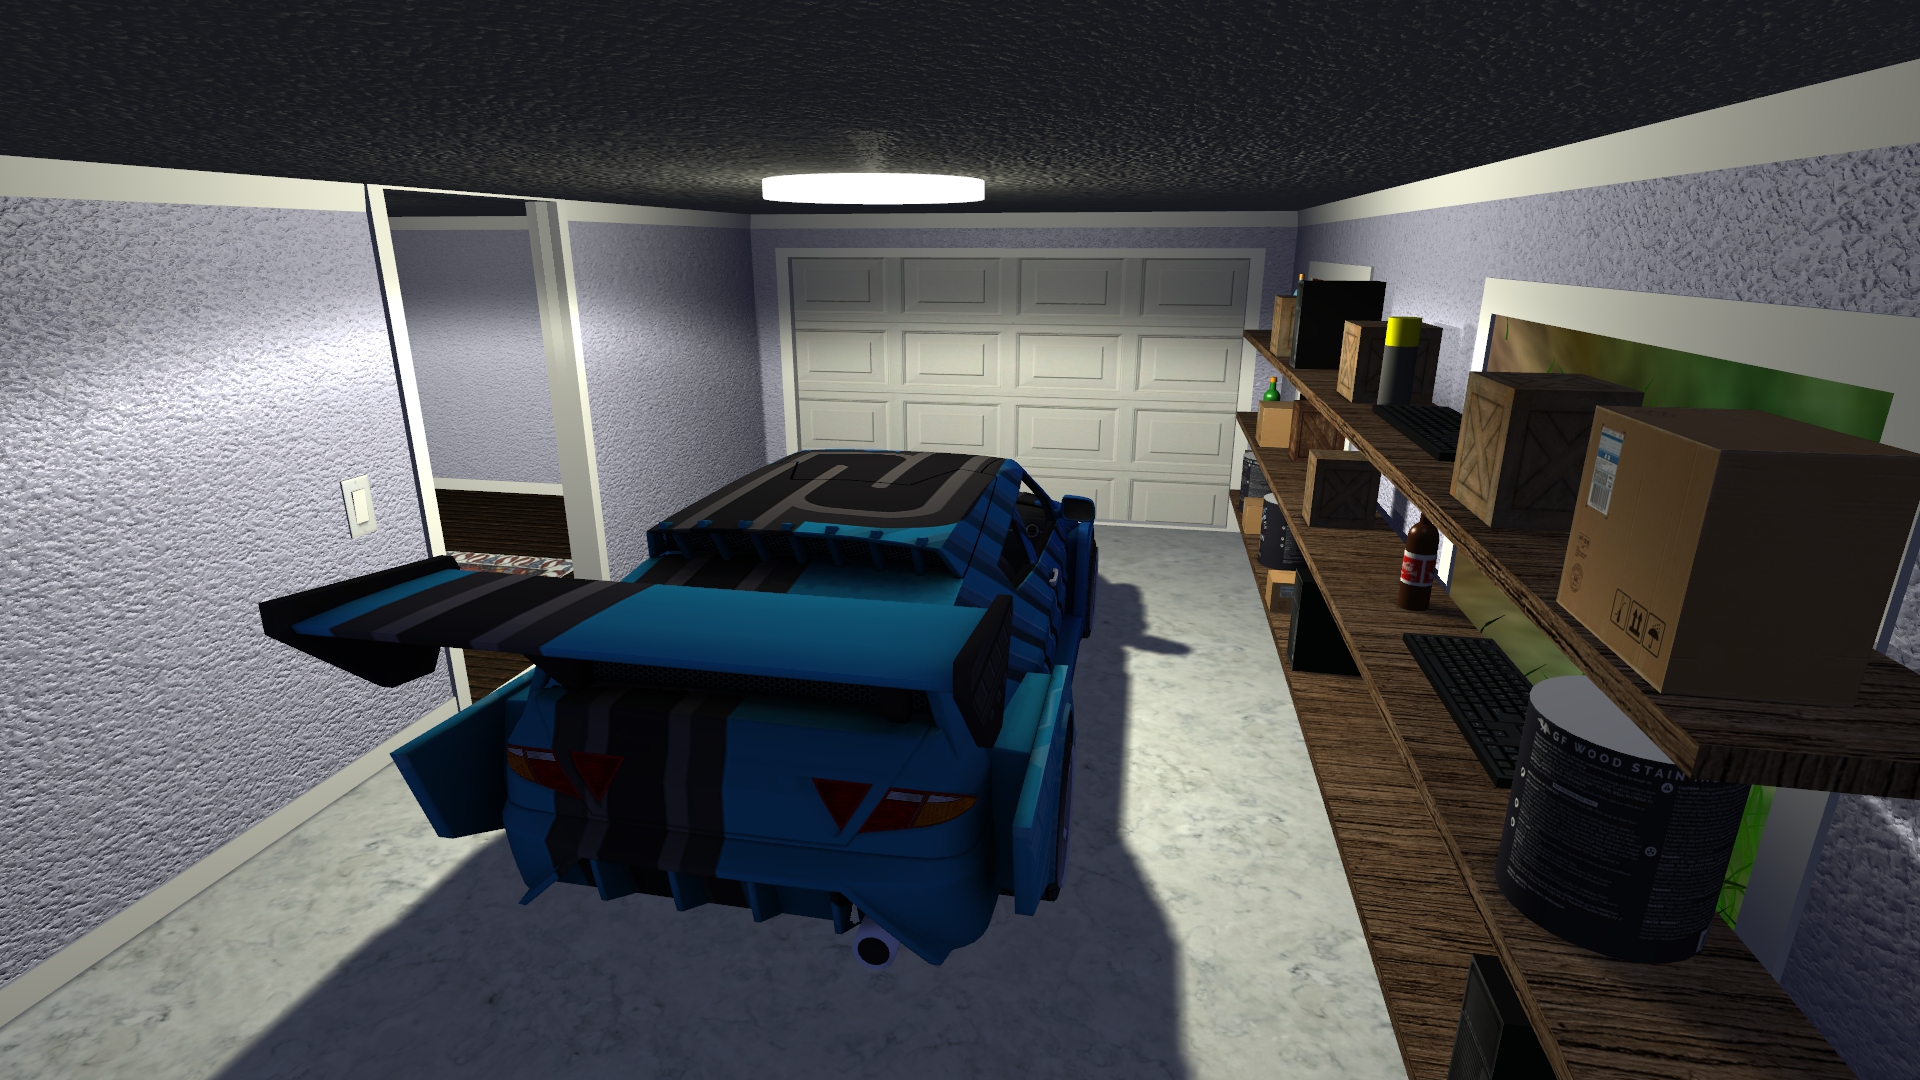
After several attempts/iterations, I have it working. Some garages have parked cars in them. Some have shelves with objects placed along one or more walls (except the wall adjacent to the door). Here's an example screenshot of the interior of a garage.

A car is parked in a garage attached to this house. There are storage shelves next to the window.
 

Chimneys and Fireplaces

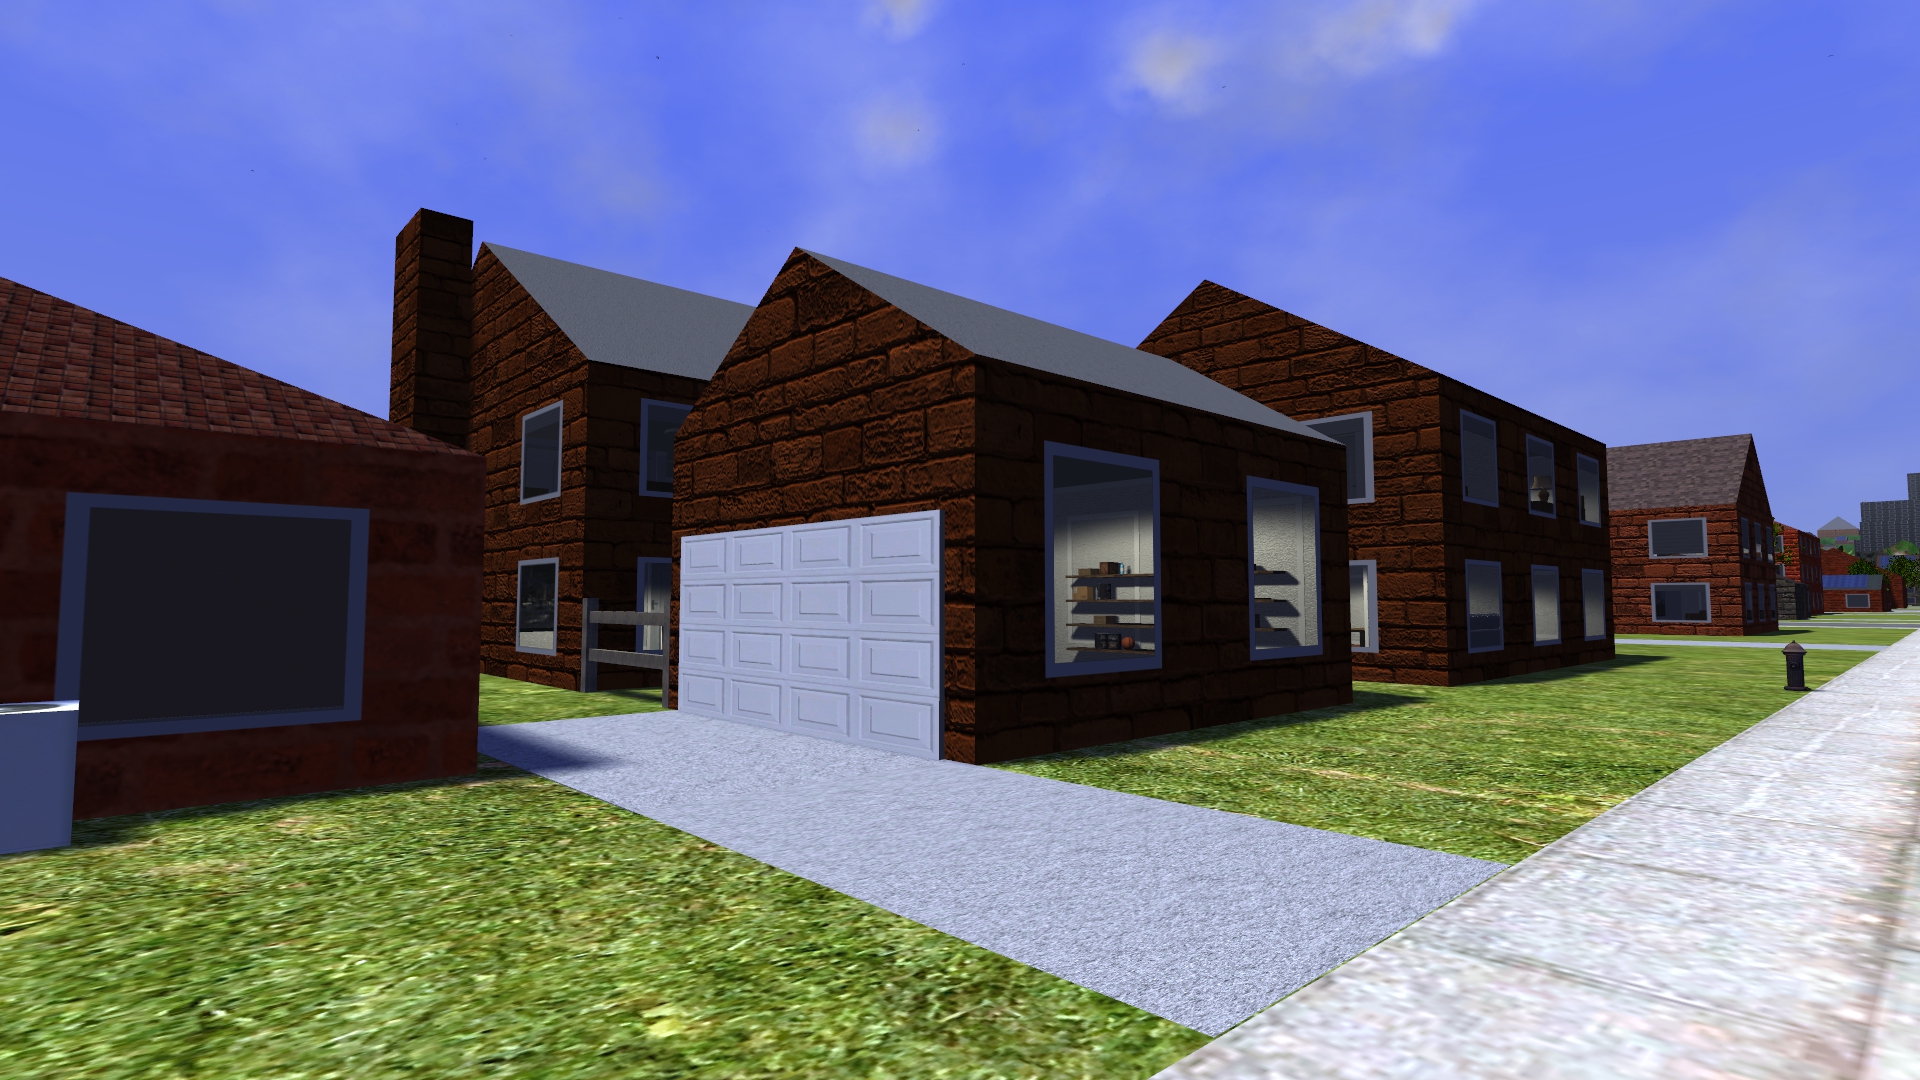
Most of my generate houses have chimneys on the roof, but they're simple placeholders that aren't connected to anything. I wanted to make them look more like real chimneys, and connect to interior fireplaces. The first step was to move some of the chimneys outside the footprint of the house so that they're against the exterior wall. My real house has a chimney like this. The fireplace is a (possibly wider) cube at the bottom of the chimney that spans most of the height of the ground floor.

Chimneys turned out to be more work than I expected. Adding exterior chimneys changed the house's bounding cube slightly, which lead to various minor issues that I came across a week later. Removing windows and doors that overlapped the chimney and fireplace was also tricky, because it lead to some window strips with odd lengths that couldn't fit an integer number of windows. The existing window placement system was coupled with the exterior wall generation so that it created whole windows, but I didn't want to try and stuff the chimney generation code into that control flow as well. Instead, I simply removed the partial windows, so that short walls sections next to chimneys were windowless.

The next problem I ran into was placing the fireplace. The easy part was adjusting room assignment to not make rooms with fireplaces into bathrooms, garages, laundry rooms, etc. While fireplaces usually go in the living room, I allowed them in bedrooms, dining rooms, and kitchens as well. This took some pressure off the room assignment algorithm and made it more likely to succeed.

The difficult part was handling walls that intersected the fireplace. It's certainly not correct to have a fireplace that's split across two rooms. However, when I got to this step in the control flow, it was too late to move the chimney/fireplace because then I would have to update the windows and doors again. I considered moving the walls instead, but that would invalidate things like garage placement. I'm sure I could always give up and regenerate a new house until the fireplace can be successfully placed, but that wasn't a great solution. All of these different constraints are too complex to manage. In the end I settled on only adding fireplaces when there's no wall in the way. This means that some chimneys still connect to nothing, but it's better than when they always connected to nothing. I don't think this would be too obvious to the player anyway since this case doesn't happen very frequently.

Here's an example of a fireplace placed in a living room. I also had to update the algorithm that placed rugs and furniture in the rooms so that they didn't block or intersect the fireplace. Maybe sometime in the future I'll place objects on top of fireplaces or otherwise improve their looks.

A fireplace has been added against the exterior wall of this living room.

Residential Neighborhoods

At this point I had two types of areas: cities full of office buildings placed in a grid of roads, and randomly placed houses and other secondary buildings with no roads. I've been trying to connect the secondary buildings with roads, but so far haven't been successful. What I have are buildings placed in a rural setting, but too close together. There are too many hills and not enough straight line spaces between buildings to place roads. I'm sure I could squish some windy roads between everything, but it wouldn't look very natural. No city planner does something that insane.

I gave up on that approach and decided instead to use the existing city road grid system to create residential neighborhoods. The main change was to place a large number of houses rather than a small number of large office buildings, but I had to make many other changes as well. The concrete sidewalks and pavement was replaced with grass lawns. Benches were removed. Parking lots were replaced by driveways. I kept the scattered trees, rows of trees along the streets, and city parks though because they seem to work with residential neighborhoods as well.

Here's a screenshot of an early attempt at a residential neighborhood. It was a good start.

Early attempt at a residential neighborhood with houses placed in the grassy areas between a uniform grid of roads.

Here you can see several issues, and there are more that aren't visible in the screenshot. Some houses are missing driveways, or have garages facing the wrong way. Others have streetlights blocking their driveways. I suppose having garages on the wrong side is the biggest problem. I'll explain how I handled that below. As for streetlights, I added a check for driveway intersections and moved the streetlight to the side of the driveway closest to its starting position.

I suppose another issue is that there are too many roads and too few houses. Most blocks have between 6 and 10 houses, which isn't very many. However, if I make the blocks larger, then the placer does some strange things. I already add an area in the center of the block where no houses can be placed to prevent interior houses that don't share an edge with a road where a driveway can be added. That works to some extent, but when the block is large enough other bad things can happen. Maybe it would be better if I made the road spacing different in X vs. Y so that the blocks are long an thin, with two long rows of houses on either side? Maybe it would work better if I divide the block into plots ahead of time such that each plot borders a road, and then place a single house on each plot. This is how city planning usually works, so it must be a good idea, right? That required significant changes to the building generation code, but gave me some interesting results.

Dividing city blocks into a uniform grid of house plots produces evenly spaced small houses.

Well that looks okay but not great. The houses are relatively small and have a very regular placement with 8 houses on most blocks. The reason they're small is because I had to add some spacing between the individual plots to make sure I can fit driveways and other details. Maybe there's too much spacing, and houses should be larger, or placed more densely per block? How about decreasing the spacing:

Uniform blocks again, but this time with less space between houses so that they can be larger.

Does that look better? I think so, but it's not obviously better than the original random house placement. I think I like the previous look of the houses because there's more variety in their sizes and placement. Maybe this plot assignment would look better if I insert some sort of border between the plots such as fences, hedges, or even slightly different colored grass. I added a config file option to switch between random placement and uniform plot placement. I'll get back to experimenting with this later, and maybe enable it if/when I space the roads further apart.

I enabled cars and pedestrians to test out how they worked. Cars can drive on the roads (as usual) or park in driveways. People walk to houses and parked cars. They really like to cut through the yards though, so maybe I need to add some fences around the properties to prevent them from trespassing. I suppose they would be less interesting to watch with that change.

Here's an updated screenshot with some of the fixes and improvements. I don't see anything obviously wrong here, though there are still some issues if you look for them in other parts of the city.

Residential neighborhood with cars on the roads, cars parked in driveways, and people walking around. I placed a Ferris wheel at the end of the street in the distance.

Placing driveways turned out to be challenging, and I still don't have it completely worked out. The driveway placement code first attempts to connect a garage to the road. Since garages currently are placed on a random side of the house, this is only successful 25% of the time, or 50% of the time for houses placed on the corner that can connect to either road. If this fails, or the house doesn't have a garage, then it attempts to connect the driveway to the nearest edge of a cube of the house, taking care to avoid chimneys/fireplaces. (I should probably move the outdoor AC units off driveways as well.) If this placement step fails it will instead add a driveway along either the left or right side of the house. Houses are placed such that there's always room for a side driveway, though two adjacent houses can have their side driveways between them overlapping each other. I suppose this is okay, because it creates what looks like a single wider driveway. Then I have to check for two overlapping cars on those driveways.

I haven't quite decided how I want to handle garages that are placed on the wrong side of the house. I guess I can start by calculating the edge(s) of the house closest to the road and passing that into the house generation code. Then at least I know if the garage is on the wrong side. If it is, I can use the brute force solution of regenerating the house until the garage is on the correct side. If that turns out to be too slow or messy, maybe I can rotate or mirror the house to put the garage on the proper edge? Or maybe choose a less optimal room as the garage, for attached garages? I'm not sure, I'll have to experiment with it.

... Okay, after experimenting, I've improved it somewhat. First of all, I can make sure detached garages are placed on the side nearest the road by mirroring them to the opposite side of the house if needed. If their entrances are in the wrong dimension (X/Y), I can make the driveway come out and make a right angle turn to meet the road. It seems like there's enough space between the houses to fit the turn, though it sometimes looks a bit odd. For interior garages, I can limit them to the side of the building facing the road, relax the constraints on size a bit, and not add a garage if this fails.

Here's what one of these right angle driveways looks like. I tried swapping the garage direction, but that causes other issues with placement and I gave up on that approach. It's not the best solution, though I suppose it's better than not having a garage or having the driveway unconnected.

One of those funny right angle driveways that has to be used because the garage isn't facing the street and there's not enough space to rotate it 90 degrees.


I really should add fences between some of the houses, at least when using a uniform grid of plots where the fence location can follow the plot boundaries. Maybe I should add swimming pools and other yard objects. That's a good task for some later time. I have such a long list of features to add! Every time I implement something, I add one or more items to the list.

Here are some screenshots of a somewhat overhead view of a residential neighborhood during the day and at night. I have cars, pedestrians, and people in buildings enabled. The night scene includes light from streetlights and dynamic car headlights. Everything I mentioned above has been fixed, including the garages connected to driveways and the streetlights blocking driveways.

A residential neighborhood show during daytime.

The same residential neighborhood show at night time. The moon is out so it's not as dark as it could be.

I also made overhead map view work correctly with residential cities, including drawing of driveways and parked cars. Here's an example showing the same city as the above images. This map is interactive and shows the cars moving in realtime. I can pan and zoom to inspect the layout of houses, driveways, etc. It may look like some driveways are missing, but I believe all houses have driveways.

Overhead map view of the same residential neighborhood, showing houses, driveways, and cars. The green square at the top is a park.

Oh, and just for fun, here's the result of incorrectly setting the house size too small compared to the plot size. This produces tiny square houses with a single room and multiple floors.

Tiny single room, multi floor houses resulting from a bug in the building generation logic.

In theory this system should scale to residential neighborhoods out to the horizon over multiple square miles. The most I've attempted so far is 18,000 buildings + 8,000 cars + 60,000 people. Keep in mind that all buildings have procedural interiors, and (non parked) cars and people are dynamic with their own AIs. I'm not sure how much higher I can make these numbers before I run into issues with memory usage and frame rate. I'll likely experiment with this later to see how large and how many cities 3DWorld can handle.